


The Science-Chic Kitchen Trend
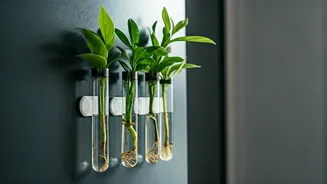
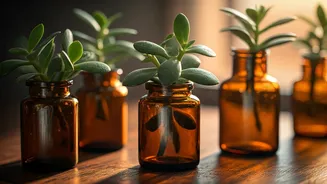
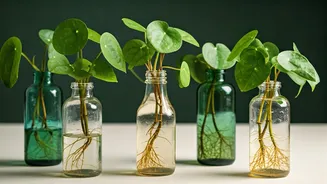
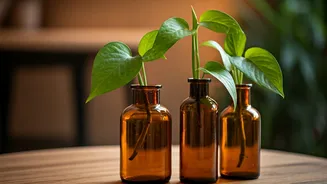
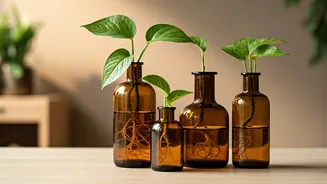
A magnetic test tube propagation station is exactly what it sounds like: a minimalist setup where you use small glass vials, typically test tubes, to root plant cuttings in water. These tubes are attached to strong magnets, allowing you to arrange them
on any magnetic surface, most popularly the refrigerator door. It’s a brilliant fusion of home décor, indoor gardening, and a dash of high-school chemistry nostalgia. This trend transforms a functional appliance into a dynamic, green feature wall. It’s an elegant solution for small spaces, bringing the joy of plant parenthood into the heart of the home without occupying precious counter or shelf space. Plus, it puts the fascinating process of root development on full display.
Why Your Fridge Will Love It
Beyond its aesthetic appeal, a fridge-door propagation station offers several benefits. Firstly, it adds a vibrant, natural element to the kitchen—a room often dominated by hard surfaces and appliances. The daily visual of new roots sprouting can be incredibly rewarding and a gentle, calming presence. Secondly, it's a space-saving marvel. For those in apartments or with limited room for pots, it leverages vertical space that is otherwise unused. It also serves as a fantastic educational tool for kids and adults alike, offering a clear view of plant biology in action. Finally, it’s a sustainable way to multiply your favourite houseplants, allowing you to grow your collection for free or share new plants with friends.
Gathering Your Supplies
Creating your own station is surprisingly easy and affordable. You can buy pre-made kits online or assemble the components yourself for a custom look. Here’s what you’ll need: * **Test Tubes:** Glass or plastic test tubes are the stars of the show. Glass looks more elegant, but plastic is a safer choice if you have children or pets. Look for tubes that are about 15-20 cm long and 1.5-2 cm in diameter. * **Strong Magnets:** Don’t skimp here. Neodymium magnets (also called rare-earth magnets) are your best bet. They are small but powerful enough to hold a water-filled test tube securely. You’ll need one for each tube. * **Waterproof Adhesive:** A strong, waterproof glue like E6000 or a two-part epoxy is essential for permanently attaching the magnets to the test tubes. * **Plant Cuttings:** The fun part! Choose from a variety of easy-to-propagate houseplants.
Choosing the Perfect Plants
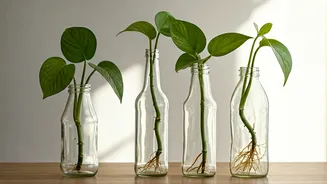
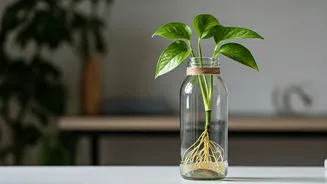
Not all plants enjoy rooting in water, but many common houseplants thrive in it. The best choices are typically vining or trailing plants that root easily from nodes. Here are some foolproof options to get you started: * **Pothos (Epipremnum aureum):** The undisputed king of propagation. It’s forgiving, fast-rooting, and looks beautiful with its heart-shaped leaves. * **Philodendron:** Varieties like the Heartleaf Philodendron are just as easy as Pothos and offer a similar lush, vining look. * **Spider Plant (Chlorophytum comosum):** Simply snip off one of the small “spiderettes” that dangle from the mother plant and place it in water. * **Wandering Dude (Tradescantia zebrina):** Known for its striking purple-and-silver striped leaves, this plant roots exceptionally quickly. * **Coleus:** For a splash of colour, Coleus cuttings root readily and bring vibrant pinks, greens, and burgundies to your display. When taking a cutting, use clean scissors and snip a 4-6 inch piece of stem, ensuring it has at least two or three leaves and a couple of nodes (the small bumps on the stem where leaves grow). Remove the lowest leaves to prevent them from rotting in the water.
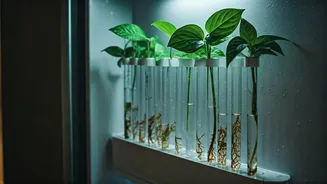
Step-by-Step Assembly
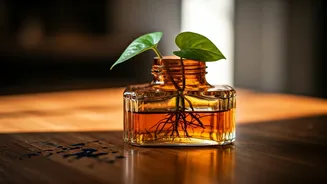
1. **Clean Your Tubes:** Start by thoroughly washing and drying your test tubes to remove any dust or residue. 2. **Attach the Magnets:** Apply a small but sufficient dab of waterproof adhesive to the back of a magnet. Press it firmly onto the side of a test tube, about two-thirds of the way up. This placement helps balance the tube when it’s full of water. Let the adhesive cure completely according to the manufacturer’s instructions—this may take 24-72 hours. Do not rush this step! 3. **Arrange Your Station:** Once the glue is fully cured, you can start arranging the tubes on your refrigerator. Play with different patterns—a straight line, a gentle curve, or a scattered cluster. 4. **Add Water and Cuttings:** Fill each tube about three-quarters full with room-temperature water. Gently place one plant cutting inside each tube, ensuring the nodes are submerged but the leaves are not.
Care and Maintenance
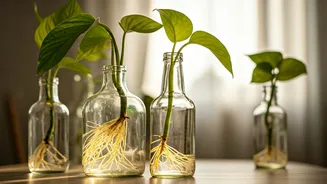
Your new living art piece is very low-maintenance. The most important task is to change the water every 5-7 days to keep it fresh and oxygenated, which prevents bacterial growth and helps the roots develop. Simply pour out the old water and refill. Within a few weeks, you should see delicate white roots begin to emerge from the nodes. Once the roots are about an inch or two long, you have a choice: you can either leave the plant in the test tube for a minimalist, long-term display (as long as you continue changing the water) or transplant it into a small pot with soil to grow into a full-sized plant.