
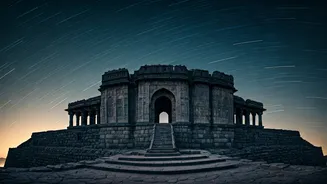


Why Brave the Night?
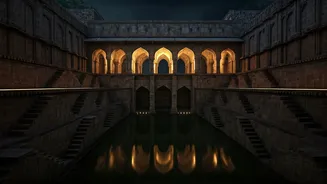
Daylight reveals the grandeur of a fort’s architecture, but night unveils its soul. A midnight photography crawl offers a unique trinity of benefits. First, solitude. The bustling crowds are gone, leaving you alone with history’s whispers. Second, the atmosphere.
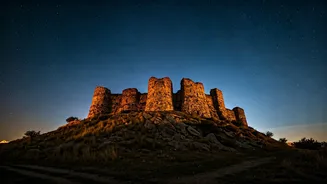
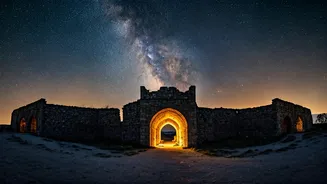
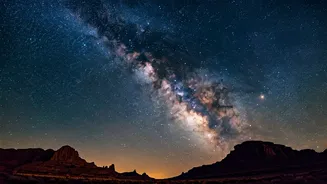
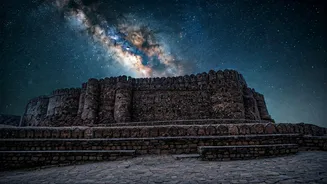
The play of moonlight and shadow on weathered stone creates a dramatic, almost mystical, mood that is impossible to experience during the day. Finally, the sky itself becomes a subject. Away from city lights, the Milky Way arches over centuries-old ramparts, creating a breathtaking juxtaposition of the terrestrial and the celestial. This isn't just photography; it's a deep, immersive experience connecting you with the past and the universe.
Gear Up for the Darkness
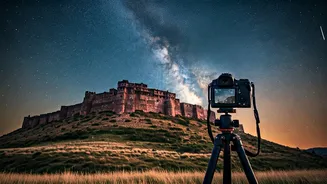
Your success hinges as much on your preparation as your photographic eye. The right gear is non-negotiable. * **A Sturdy Tripod:** This is your most crucial piece of equipment. Long exposures are necessary for night photography, and any camera shake will ruin the shot. Don't compromise on a stable tripod. * **DSLR or Mirrorless Camera:** You need a camera with manual controls to adjust shutter speed, aperture, and ISO independently. * **Wide-Angle Lens:** A lens with a wide aperture (f/2.8 or lower) is ideal. It allows more light to enter the sensor, which is critical in low-light conditions. A focal length between 14mm and 24mm is perfect for capturing both the fort and the expansive night sky. * **Extra Batteries and Memory Cards:** Cold weather can drain batteries faster, and long exposures consume power. Always carry at least one spare, fully charged battery. * **A Headlamp with Red Light Mode:** A headlamp keeps your hands free. The red light mode is essential as it preserves your night vision and is less disruptive to fellow photographers.
Mastering the Midnight Shot
Night photography can seem intimidating, but it boils down to a few key settings. Switch your camera to Manual (M) mode and start with this baseline: * **Aperture:** Set your lens to its widest possible aperture (the lowest f-number, like f/2.8). This lets in the maximum amount of light. * **Shutter Speed:** This is where the magic happens. Start with a 20- to 30-second exposure. This is long enough to capture faint starlight but short enough to prevent stars from turning into trails (due to Earth's rotation). Use the "500 Rule" as a guide: divide 500 by your lens's focal length to get the maximum shutter speed before stars start trailing. * **ISO:** Your ISO setting determines the sensor's sensitivity to light. Start with an ISO between 1600 and 3200. A higher ISO captures more light but can introduce noise (graininess) into the image. Experiment to find the best balance for your camera. * **Focus:** Your camera's autofocus will not work in the dark. Switch your lens to manual focus. Use your camera's live view, zoom in on the brightest star or a distant light, and manually adjust the focus ring until it is perfectly sharp.
Choosing Your Fortress
India is dotted with magnificent hill forts, but not all are suitable for a night expedition. The Sahyadri range in Maharashtra, with forts like Rajmachi, Lohagad, and Kalsubai, is a popular destination for night treks and astrophotography. When choosing a location, consider three factors: accessibility, light pollution, and regulations. Look for forts that are relatively far from major cities to ensure dark skies. Online light pollution maps can be a great help. Most importantly, always check local regulations. Some forts are part of protected reserves and may have restricted access or require permits for night entry. Join trekking or photography groups online to get the most current information and advice.
Safety is Your First Priority
An adventure is only memorable for the right reasons. Exploring ruins at night comes with inherent risks, so prioritise safety above all else. * **Never Go Alone:** Always go in a group of at least three people. There is safety in numbers. * **Inform Someone:** Leave your detailed itinerary with a friend or family member who is not on the trip. Include your location, route, and expected return time. * **Check the Weather:** A clear sky can turn stormy quickly, especially in the mountains. Check the forecast rigorously before you leave. * **Pack Essentials:** Beyond your camera gear, carry a first-aid kit, plenty of water, energy-rich snacks, and warm layers of clothing. Temperatures can drop significantly at night, even in summer.