


Why Jade Plants Are Propagation Gold
Often called the ‘friendship tree’ or ‘money plant’, Crassula ovata, or the jade plant, is a succulent renowned for its resilience and good-luck symbolism. More importantly for aspiring green thumbs, it’s incredibly generous. Jade plants are practically
designed to be propagated. Their fleshy leaves and stems contain all the necessary components to sprout new roots and grow into entirely new plants. This makes them the perfect starting point for anyone new to plant propagation. Unlike fussier botanicals, jade cuttings have a high success rate, offering a rewarding experience that builds gardening confidence with every new root that appears.
Taking the Perfect Cutting
Your journey begins with a healthy ‘mother’ jade plant. Look for a mature, vibrant stem that’s at least three to four inches long with several sets of leaves. Using a clean, sharp knife or pair of scissors, make a clean cut just below a leaf node (the point where a leaf attaches to the stem). Once you have your cutting, the next step is crucial for preventing rot: patience. Remove the lowest set of leaves to expose a small section of bare stem. Then, leave the cutting in a dry, shaded place for two to three days. This allows the cut end to ‘callus’ over, forming a protective seal that will prevent it from absorbing too much water and rotting when you place it in your bottle.
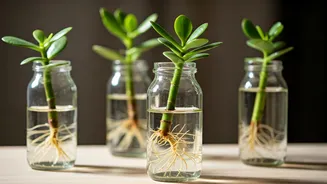
Choosing Your Recycled Vessel
This is where style meets sustainability. Scour your kitchen and pantry for sleek glass bottles. Clear glass is ideal, as it allows you to monitor root growth—a magical process you won’t want to miss. Look for bottles with a narrow neck, which will hold the cutting upright and prevent the leaves from slipping into the water. Small olive oil bottles, boutique sauce jars, old-fashioned perfume bottles, or single-serving glass soda bottles are all fantastic candidates. Ensure the bottle is thoroughly cleaned with soap and warm water to remove any residue. The beauty of this method is its dual purpose: you’re giving a bottle a second life and creating a minimalist, living vase.
The Simple Water Propagation Method
Once your cutting has callused and your bottle is clean, it's time to bring them together. Fill the bottle with enough room-temperature water to submerge the bare part of the stem, but make sure no leaves are touching the water. Place your new propagation station in a spot that receives bright, indirect sunlight. A windowsill that doesn't get harsh, direct afternoon sun is perfect. The final step is maintenance, which is wonderfully simple. Change the water every five to seven days to keep it fresh and oxygenated, preventing bacterial growth and ensuring your cutting has the best environment to thrive.
From Water to Soil: The Next Chapter
Within a few weeks, you should start to see delicate, white roots emerging from the stem. This is the moment of triumph! Allow the roots to grow to about an inch or two in length before thinking about the next step. Once they look sturdy, your new plant is ready to be transplanted into soil. Choose a small pot with drainage holes and fill it with a well-draining cactus or succulent potting mix. Gently plant your rooted cutting, water it lightly, and place it back in its bright, indirect light spot. Your recycled bottle is now free for the next cutting, continuing the beautiful cycle.