
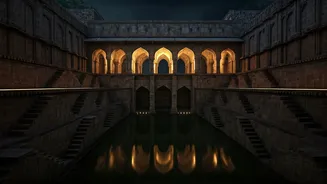
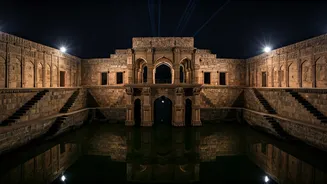


The Appeal of Ancient After Dark
There's a unique magic to photographing ancient ruins at night. During the day, these sites are filled with people and harsh sunlight. But after sunset, they transform. The quiet allows you to connect with the history of the place, and long exposure photography
reveals a world hidden from the naked eye. The technique allows you to smooth out water, blur clouds into streaks, and make stars pop against the inky blackness. By painting with light and time, you can create images that feel otherworldly, blending the timelessness of the ruins with the eternal dance of the cosmos. It’s less about documenting a place and more about capturing its soul.
Your Essential Gear Checklist
You don't need a studio's worth of equipment, but a few key items are non-negotiable for good night shots. **Camera with Manual Mode:** A DSLR or mirrorless camera that allows you to control aperture, shutter speed, and ISO is essential. This is the heart of your operation. **Sturdy Tripod:** This is your most important accessory. For exposures lasting several seconds or even minutes, the camera must be perfectly still. Any wobble or vibration will result in a blurry mess. Don't skimp here; a solid tripod is worth its weight in gold. **Wide-Angle Lens:** A lens in the 14-24mm range is ideal for capturing the grand scale of the ruins against the vast night sky. A 'fast' lens (with a wide aperture like f/2.8 or f/4) is a bonus as it lets in more light. **Remote Shutter or Timer:** Pressing the shutter button by hand can shake the camera. Use a remote shutter release or your camera's built-in 2-second timer to ensure a shake-free start to your exposure.
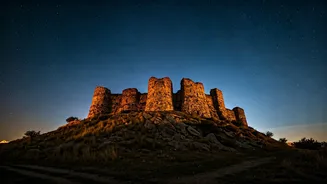
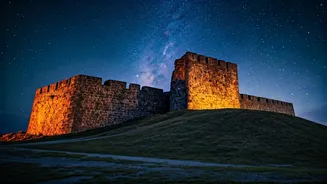
Finding a Spot and The Rules
This is the most crucial planning step. Many official Archaeological Survey of India (ASI) sites close at sunset. Do not trespass. Instead, plan your shoot around these limitations. The best time is often the 'blue hour'—the period right after the sun sets but before it's completely dark, when the sky has a deep, rich blue hue. Scout your location during the day. Look for spots outside the official boundary that offer a clear, unobstructed view of the ruins. Places like Hampi or Mahabalipuram have many ruins visible from public areas. Some forts in Rajasthan or less-formal historical sites might have more lenient access. Always check local timings and regulations online or by asking locals. The goal is to be respectful of the site and the rules while still getting your shot.
Mastering Your Camera Settings
Night photography can seem intimidating, but it boils down to a simple starting recipe. Set your camera to Manual (M) mode. **ISO:** Start with a low ISO, around 100 to 400. This minimises digital 'noise' or grain, keeping your image clean and sharp. **Aperture:** Set your lens to its widest possible aperture (the lowest f-number, e.g., f/2.8 or f/4). This allows the maximum amount of light to hit your camera's sensor. **Shutter Speed:** This is your main creative tool. There's no single correct answer. Start with a 20-30 second exposure. If the image is too dark, increase the time. If it’s too bright, decrease it. Use your camera's 'Bulb' mode for exposures longer than 30 seconds, which allows you to keep the shutter open for as long as you hold the remote button. **Focus:** Your camera's autofocus will fail in the dark. Switch your lens to manual focus (MF). Use a torch to illuminate a part of the ruin, zoom in using your camera’s live view screen, and manually turn the focus ring until it’s perfectly sharp. Then, don't touch the focus ring again!
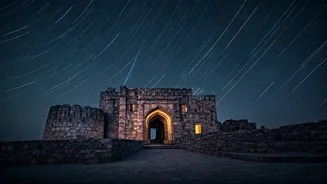
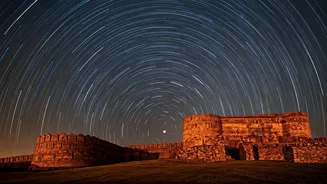
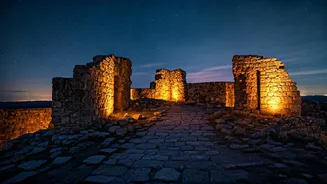
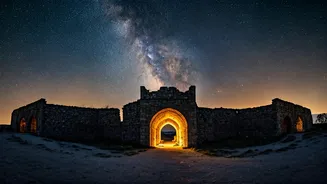
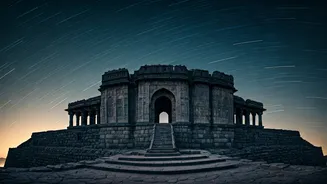
Creative Techniques for Surreal Shots
Once you have the basics down, it's time to get creative. One of the most popular techniques is 'light painting.' During your long exposure, use a torch or even your phone's flashlight to 'paint' light onto the darker parts of the ruins. Move the light source continuously so it doesn't create a bright hotspot. A quick sweep of light across a dark wall can bring out incredible texture and detail. If you're in a dark location away from city lights, you can also capture star trails. This requires much longer exposures, often several minutes (or multiple shorter exposures stacked together in post-processing). The Earth's rotation will cause the stars to appear as beautiful circular streaks of light in your final image, creating a truly dynamic and surreal effect.