


The Charm of Upcycled Greenery
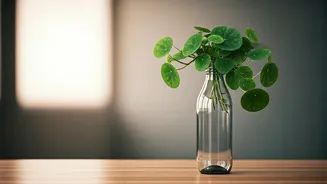
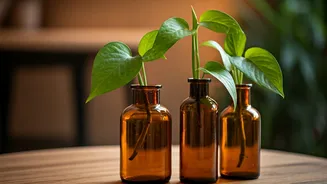
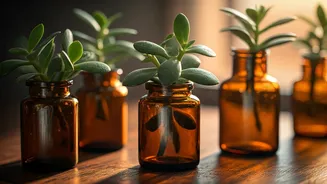
Before we dive into the 'how-to', let's talk about the 'why'. Upcycling isn't just about saving an item from the landfill; it's about reimagining its purpose. A clear glass bottle—from a bottle of juice, a sauce, or a cold-brewed coffee—has the perfect
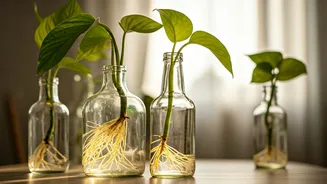
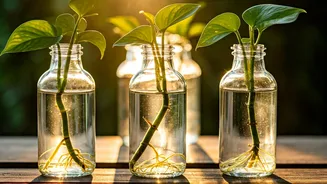
minimalist aesthetic to become a propagation vessel. It allows you to watch the magic of roots growing in real-time, a fascinating process that’s often hidden beneath the soil. Plus, money plants (Epipremnum aureum) are famously resilient and thrive in water, making them the perfect candidate for this project. They are known for their air-purifying qualities and the lush, trailing vines they produce, adding a touch of nature's elegance to any shelf, desk, or windowsill.
Gathering Your Simple Supplies
The beauty of this project lies in its simplicity. You likely have most of these items at home already. Here’s what you’ll need: * A Clear Glass Bottle: Any size works, from a small sauce bottle to a larger wine bottle. Ensure the neck is wide enough to fit a plant stem. * A Healthy Money Plant: You'll be taking a cutting from an existing plant. * Clean, Sharp Scissors or Pruning Shears: A clean cut is crucial for the plant's health. * Water: Room temperature tap water that has been left to sit for a few hours is fine, or you can use filtered water. * For Cleaning: Hot, soapy water and a bottle brush if you have one. For stubborn labels, you might need some cooking oil and a scrubber.
Prepping Your Glass Bottle
A clean vessel is key to preventing bacteria from harming your new plant cutting. Start by peeling off any paper labels. If a sticky residue remains, a common household trick works wonders: apply a thin layer of cooking oil, let it sit for 10-15 minutes, and then scrub it off with a scouring pad and soap. Once the outside is clean, wash the inside thoroughly with hot, soapy water. Use a bottle brush to get into all the nooks and crannies. Rinse it out completely until no soap bubbles remain. A sparkling clean bottle not only looks better but also provides a healthier environment for root development.
Taking the Perfect Cutting
This is the most important step for ensuring successful propagation. Look at your mother money plant and identify a healthy, mature vine. You are looking for a section with at least 3-4 leaves and, most importantly, a 'node'. A node is a small brown bump or nub on the stem, usually opposite a leaf. This is where new roots will sprout. Using your clean scissors, make a cut about an inch below a node. It’s a good idea to take a cutting that has several nodes along its length. Once you have your cutting, gently remove the leaf closest to the cut end. This is to ensure the node that will be submerged in water isn't competing with a leaf, which could rot.
Assembling and Placement
Now for the easiest and most satisfying part. Fill your clean glass bottle with room temperature water, leaving about an inch of space at the top. Gently place your money plant cutting into the bottle, ensuring at least one or two nodes are fully submerged. The remaining leaves should be well above the waterline. Place your new propagation vessel in a spot that receives bright, indirect light. A spot near a window but not in the direct path of harsh sun is perfect. Direct sunlight can scorch the leaves and encourage algae growth in the water.
Ongoing Care and What to Expect
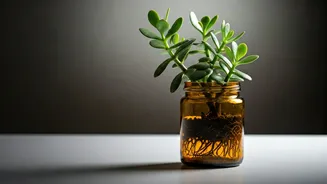
Your job isn't quite done. To keep the water fresh and oxygenated, change it every 5-7 days. Simply remove the cutting, pour out the old water, rinse the bottle, and refill it with fresh water. Within a few weeks, you should start to see delicate white roots emerging from the submerged nodes. This is the moment of triumph! The plant can live happily in water for a very long time. If the water starts to look cloudy or green, change it more frequently. Money plants are not heavy feeders, but after a few months, you can add a single drop of liquid houseplant fertiliser to the water once a month to provide some nutrients.