






The Real Cost of Salon Style
A chic braid is more than just a hairstyle; it's a versatile look that can take you from a workday to a wedding. However, achieving that polished look often comes with a hefty price tag. A professional braiding session can set you back significantly.
In cities like Bengaluru, a single or double Dutch braid can cost upwards of ₹1,700. Full-head styles like cornrows or box braids can range from ₹3,000 to over ₹15,000 depending on complexity. By investing a little time in learning a key technique, you're not just gaining a new skill; you're making a savvy financial decision that pays for itself after just one or two uses.
Your Signature Braid: The Dutch Braid
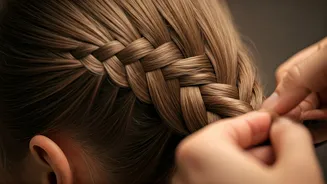
While there are many braids to choose from, the Dutch braid is the perfect one to master. Often called the 'reverse French braid' or an 'inside-out braid,' it creates a prominent, 3D effect as the braid sits on top of the hair. Its real power lies in its versatility. Once you can do a Dutch braid, you can create elegant single braids, trendy double 'boxer braids,' a Dutch braid crown, or a stylish braided ponytail. It's a foundational skill that looks far more complicated than it actually is, making it the ultimate style to have in your arsenal.
Preparation is Everything
A great braid starts long before you make the first plait. Professional-looking results depend on proper hair prep. Start with clean, detangled hair. It’s best to braid hair when it is completely dry, as wet hair is more fragile and prone to breakage. If you have flyaways, a small amount of smoothing cream or a light mist of texturizing spray can provide grip and keep the sections neat. Having your tools ready—a brush, a fine-toothed comb for parting, and hair elastics—will make the process smoother and less frustrating.
How to Dutch Braid: Step-by-Step
Ready to try? Find a comfortable spot in front of a mirror. 1. Start by taking a section of hair from your hairline at the top of your head. 2. Divide this section into three equal smaller strands: left, middle, and right. 3. Here's the key Dutch braid move: cross the right strand under the middle strand. Then, cross the left strand under the new middle strand. You've completed your first 'stitch.' 4. Now, begin adding hair. Before you cross the right strand under again, pick up a small new piece of hair from the right side of your head and join it to that right strand. Then, cross the entire combined section under the middle. 5. Repeat on the other side: pick up a new piece of hair from the left, join it to the left strand, and cross the whole thing under the middle. 6. Continue this pattern—adding hair and crossing under—all the way down your head. Keep the tension firm for a neat braid. 7. Once you reach the nape of your neck and there's no more hair to add, continue with a regular three-strand braid (still crossing under for consistency) to the ends and secure with an elastic.
Finishing Touches for a Polished Look
To elevate your braid from homemade to salon-perfect, focus on the finish. Once the braid is secured, you can gently pull on the outer edges of the braided sections. This technique, called 'pancaking,' makes the braid appear fuller and more voluminous. A light spritz of hairspray or a touch of smoothing serum can tame any remaining flyaways. For longevity, especially overnight, wrapping your hair in a silk or satin scarf is a must. It reduces friction, prevents frizz, and helps your beautiful work last longer.