
The Street-Style Standard
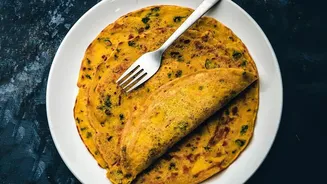
The perfect street-style moong dal chilla is a study in contrasts. It boasts delightfully crisp, lacey edges that give way to a soft, fluffy interior. It’s savoury, light, and protein-packed, making it a beloved breakfast and snack across India. However,
home cooks often face a common set of problems: chillas that are too soft, stick to the pan, cook unevenly, or burn before the inside is ready. The dream is that uniform golden browning and satisfying crunch, but achieving it often feels just out of reach. The good news is that mastering this popular dish is less about a secret ingredient and more about mastering a simple technique: temperature control.
The Problem with High Heat
In a rush, it’s tempting to crank up the stove to high, hoping to cook your chillas faster. This is the single biggest mistake. When the pan is too hot, the batter sets almost instantly upon contact. The outside cooks far too quickly, often developing dark, burnt spots while the inside remains dense and undercooked. You're left with a chilla that is neither crispy nor properly cooked through. A scorching hot pan also makes it nearly impossible to spread the batter thinly and evenly; it will seize up and tear. This high-heat approach rushes the process, ultimately sacrificing both the texture and the even golden colour that makes a chilla so appealing.
The Magic of Medium Heat
This is where patience pays off. Cooking moong dal chilla on a medium flame is the key to success. Medium heat allows the batter to spread smoothly into a thin, even circle without instantly seizing. It provides enough warmth to cook the chilla through to the center, ensuring the dal is no longer raw. Most importantly, this moderate temperature allows the Maillard reaction—the chemical process responsible for browning and creating complex flavour—to happen gradually. Instead of scorching, the surface develops a consistent, beautiful golden-brown crust. The edges have time to lose moisture and become delightfully crisp, while the center gently steams, remaining soft and tender. The process might take a minute or two longer per chilla, but the results are vastly superior.
Perfecting Your Technique
First, focus on your batter. It should be of a pouring consistency, but not watery—think slightly thick pancake batter. Adding a tablespoon of rice flour or semolina (suji) can also enhance crispiness. Next, heat your tawa or non-stick pan over a medium flame. To check if it's ready, sprinkle a few drops of water; they should sizzle and evaporate quickly. Pour a ladle of batter in the center and gently spread it outwards in a circular motion. Drizzle a little oil or ghee around the edges. Now, wait. Don't be tempted to flip it too early. Cook for 2-3 minutes, until the edges start to lift and the underside is a lovely golden brown. Flip carefully and cook the other side for another minute or two. This patient, medium-heat method ensures a perfect chilla every time.
Pro Tips for Ultimate Crispiness
Beyond heat control, a few other details can elevate your chilla game. If using a cast-iron tawa, make sure it is well-seasoned to prevent sticking. For any pan, wiping it with a lightly oiled cloth or half an onion before pouring each chilla creates a perfect non-stick surface. Avoid covering the pan with a lid while cooking. While it may seem like it speeds things up, trapping steam is the enemy of crispiness and will make your chilla soft. Finally, cook one chilla at a time. Overcrowding the pan lowers the temperature and creates steam, preventing any of them from getting truly crisp. For a more filling meal, you can add finely chopped onions or grated vegetables to the batter, or stuff the cooked chilla with a savoury paneer filling.