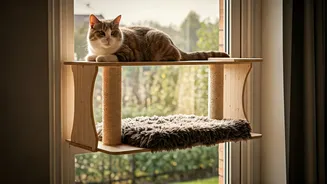


Why Your Cat Deserves a Window Perch
For indoor cats, a window is like a television, providing endless entertainment and mental stimulation. [6] Watching birds, squirrels, and passing cars keeps their minds active and prevents boredom. [2] Veterinary behaviorists often recommend window access
as a key part of an enrichment plan. [1, 6] Perches offer a high, safe vantage point, which satisfies a cat’s natural instinct to survey their territory from a secure spot. [2, 5] This elevation can reduce stress and provides a dedicated, warm place for them to nap in the sun. [7] A multi-level design takes this a step further, offering choices and encouraging light exercise as they jump between platforms. [2]
Planning Your Purr-fect Design
Before you start cutting wood, take some time to plan. First, choose the right window—ideally one that gets good sunlight and has interesting outdoor activity. [22] Measure the window and the surrounding wall space carefully. [10] A staggered or zig-zag layout for the shelves can make climbing more engaging for your cat. [10] Sketch out your multi-level design, considering the size of your cat. Shelves should be at least 10 to 12 inches deep to give them enough space to lounge comfortably. [5, 11] Plan for a vertical distance of about 12 to 18 inches between shelves and a horizontal gap that is manageable for your cat's agility. [12]
Gathering Materials and Tools
Safety and durability are paramount. Opt for solid wood planks or high-quality plywood that's at least a half-inch thick. [5] Cedar and redwood are excellent choices as they are naturally resistant to rot and insects. [15, 21] For hardware, you'll need sturdy 'L' brackets, heavy-duty wall anchors, and wood screws. [5] The most critical step for safety is to mount the brackets directly into wall studs. [10, 13] Use a stud finder to locate them; drywall alone is not strong enough to support a jumping cat. [12] For the finishing touches, you'll want a comfortable, grippy surface. Scraps of carpet, faux fur, or a jute scratching mat are all great options. [11, 13] Ensure any paint or finish you use is non-toxic and pet-safe. [14]
A Step-by-Step Building Guide
Once you have your materials, it’s time to build. Start by cutting your wood planks to the desired shelf sizes based on your plan. Sand all the edges smooth to prevent splinters. If you're painting or staining the shelves, do this now and let them cure completely. [10] Next, use your stud finder and painter's tape to mark the locations for your brackets on the wall, ensuring they are level. [10] Drill pilot holes into the studs to make attaching the brackets easier and prevent the wood from splitting. [12] Secure the 'L' brackets firmly to the wall using heavy-duty screws. Place your wooden shelf on top of the brackets and screw it in from the bottom for maximum stability. [5] Repeat this process for each level of your design. Finally, attach your chosen fabric or carpet to the top of each shelf using a strong, non-toxic adhesive or by wrapping and stapling it underneath. [11]
Finishing Touches and Safety Checks
With the perch assembled, give it a thorough safety check. Gently but firmly press down on each shelf to ensure it's securely mounted and doesn't wobble. [22] Double-check that all screws are tight and the brackets are flush against the wall. The final step is to make it inviting. Add a soft cushion, a favorite blanket, or even a hanging toy to one of the levels. [3] You can enhance the 'cat TV' experience by placing a bird feeder or butterfly-attracting plants outside the window. [1] Introduce your cat to their new furniture and let them explore at their own pace. Soon enough, you will see them claiming their new favorite spot.