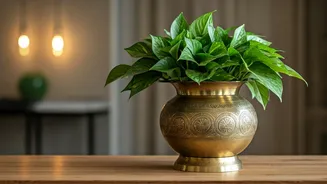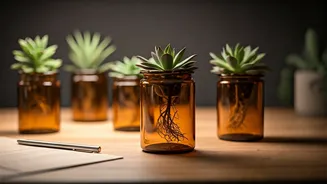


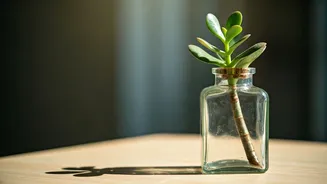


The Allure of Amber Glass
There's a reason amber glass has captured the imagination of designers and home decor enthusiasts. Its warm, translucent brown hue filters light beautifully, casting a soft, inviting glow. This isn't just a functional choice for protecting light-sensitive
contents like medicines or essential oils; it's a powerful aesthetic one. The colour evokes a sense of vintage apothecary charm, hinting at history, science, and nature all at once. Unlike clear glass, which can sometimes feel stark, amber provides a rich, earthy backdrop that makes the vibrant green of a plant cutting truly pop. It feels both sophisticated and grounded, making it an ideal material for adding a touch of understated elegance to a modern workspace without creating visual clutter.
Your Desk, But Greener
The impulse to bring plants to our desks is about more than just decoration. It’s rooted in the concept of biophilic design—the idea that humans have an innate need to connect with nature. Studies have suggested that even small doses of nature in our immediate environment can have significant benefits. Introducing greenery into your workspace can help reduce stress, improve focus, and even boost creativity. A tiny plant propagation in an amber vial is a low-commitment way to tap into these benefits. It’s a living, breathing element on your desk that quietly reminds you to pause, breathe, and appreciate the simple beauty of growth. In a digital-heavy work life, this small analogue detail can make a world of difference to your daily well-being.
Gathering Your Materials
The beauty of this project lies in its simplicity and accessibility. You likely already have some of what you need. Start by looking for small amber glass bottles or vials you can repurpose. Old vitamin or supplement bottles, empty tincture bottles, or even some cough syrup containers are perfect candidates. If you don't have any on hand, they are inexpensive to buy online from stores that supply DIY cosmetic or aromatherapy materials. Look for vials between 30ml and 100ml. Once you have your vials, simply soak them in warm, soapy water to remove any labels. A little rubbing alcohol or oil can help with stubborn adhesive residue. Rinse them thoroughly and let them dry. That’s it—your planters are ready.
Choosing the Right Plant Cuttings
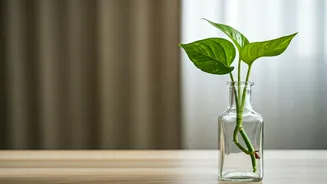
Not all plants are suited for living in a small vial of water, but many common and resilient houseplants thrive this way. This method, called water propagation, is perfect for starting new plants from cuttings. Your best bets are vining plants that root easily in water. Look for: - **Pothos (Epipremnum aureum):** The undisputed king of easy-care plants. Varieties like Golden Pothos, Marble Queen, or Neon Pothos all work beautifully. - **Philodendron (Philodendron hederaceum):** Similar to pothos, the classic heartleaf philodendron is incredibly easy to propagate. - **Spider Plant (Chlorophytum comosum):** Those little 'pups' or 'spiderettes' that dangle from the mother plant are perfect for placing in a vial. - **Wandering Dude (Tradescantia zebrina):** Known for its striking purple and silver leaves, this plant roots exceptionally fast in water. When taking a cutting, make sure to include at least one or two nodes (the small bumps on the stem where leaves grow), as this is where new roots will emerge.
Assembly, Styling, and Care
Assembling your workstation planter is the easiest part. Take your plant cutting and place it in the clean amber vial. Fill the vial with room-temperature tap water, ensuring the nodes are submerged but the leaves are above the water line to prevent rot. That’s all it takes. For styling, group two or three vials of slightly different heights together for a dynamic display. You can also place a single vial next to your monitor or pen holder for a minimalist accent. The look is clean, simple, and intentional. Care is minimal. Change the water every week or so to keep it fresh and provide oxygen for the developing roots. Top it off as needed due to evaporation. Once the cutting has developed a healthy root system (usually an inch or two long), you can either pot it in soil or simply leave it in the vial as a permanent hydroponic feature, continuing to change the water regularly.