


Why Propagate the Trailing Jade?
The Trailing Jade, or *Kleinia petraea* (formerly *Senecio jacobsenii*), is a favourite among both new and experienced plant parents in India for good reason. Its thick, overlapping leaves cascade beautifully over the sides of a pot, creating a lush,
'waterfall' effect. More importantly, it’s incredibly resilient. It tolerates infrequent watering and a range of light conditions, making it perfectly suited to busy households. Propagation is not just a free way to get more plants; it’s also a way to create fuller, denser pots or share your plant with friends. The method of propagating in a sleek glass jar adds a decorative touch, turning a simple gardening task into a piece of living art for your desk or windowsill.
Gathering Your Simple Tools
One of the best parts of this project is its simplicity. You don’t need a fancy gardening kit or specialised equipment. Before you begin, gather these four basic items: 1. **A Healthy Mother Plant:** Choose a mature, well-established Trailing Jade with plenty of long, healthy stems. 2. **Clean, Sharp Scissors or Pruners:** Using a clean cutting tool is essential to prevent introducing bacteria or fungus to the plant cutting, which can cause it to rot. 3. **A Sleek Glass Jar or Vase:** A clear vessel is ideal because it allows you to watch the roots grow. A small bottle with a narrow neck is perfect for holding a single stem upright. Ensure it's thoroughly cleaned before use. 4. **Water:** Regular tap water is usually fine, but if your water is heavily treated, you can let it sit out for 24 hours to allow chlorine to evaporate.
Step 1: Taking a Healthy Cutting
The success of your propagation starts with a good cutting. Look for a healthy, vibrant stem on your mother plant that is at least 4-6 inches long. Using your sharp, clean scissors, make a clean snip just below a leaf node (the point on the stem where a leaf emerges). This area is rich with the cells needed to produce new roots. Once you have your cutting, gently remove the bottom one or two leaves. This is crucial because any leaves left submerged in water will rot, fouling the water and potentially killing your cutting. You want a bare stem of at least an inch or two at the bottom to place in the water.
Step 2: The All-Important Curing Period
This step is one that many beginners skip, but it is vital for succulent propagation. Unlike many other houseplants, succulent cuttings need to 'heal' before they are introduced to water. The fresh cut is a wound that can easily absorb too much water and begin to rot. To prevent this, simply place your cutting in a dry, shaded spot with good air circulation for one to three days. During this time, the cut end will dry out and form a protective callus. You’ll know it’s ready when the cut end feels dry and sealed to the touch. Don't worry, the resilient Trailing Jade will be perfectly fine out of soil or water for this short period.
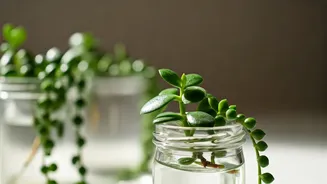
Step 3: Into the Water
Once your cutting has callused over, it’s time for its new home. Fill your sleek glass jar with enough water to submerge the bottom 1-2 inches of the bare stem. Avoid letting any leaves touch the water. Place the jar in a spot that receives bright, indirect sunlight. A windowsill that doesn't get harsh afternoon sun is perfect. Direct sunlight can be too intense, heating the water and scorching the delicate cutting. Now, the waiting game begins. The beauty of the glass jar is that you get a front-row seat to the magic of root development.
Step 4: Watching for Roots and Maintenance
You should start to see tiny, white roots emerging from the stem within two to four weeks, though it can sometimes take longer depending on the season and light conditions. To keep your cutting healthy during this phase, change the water every 3-5 days. This replenishes oxygen and prevents the growth of algae or bacteria. If the water looks cloudy, change it immediately. Don’t be discouraged if it takes a little while; the Trailing Jade is hardy, and as long as the stem and leaves look firm and healthy, it’s working on it.
Step 5: Transitioning to Soil
Once the new roots are about an inch long, your cutting is ready to be planted in soil. Water roots are different from soil roots—they are more delicate. To ease the transition, choose a small pot with a drainage hole and fill it with a well-draining succulent or cactus mix. You can make your own by mixing regular potting soil with sand or perlite. Make a small hole in the soil with your finger, gently place the rooted cutting inside, and backfill the soil to support it. Water it lightly. For the first week, keep the soil slightly moist (but not soggy) to help the roots acclimate. After that, you can switch to a regular succulent watering schedule—watering thoroughly only when the soil is completely dry.