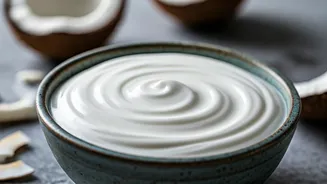


What is This Viral Yogurt Hack?
Across food blogs and social media, a surprisingly simple method for making homemade coconut yogurt is earning rave reviews for its simplicity and delicious results. The appeal lies in its minimalist approach: all you need are two key ingredients to create
a rich, probiotic-packed yogurt that rivals expensive store-bought versions. [1, 17] This trend is a game-changer for anyone who is dairy-free, vegan, or simply looking to avoid the additives, sugars, and thickeners often found in commercial yogurts. [9] The process relies on basic kitchen fermentation, harnessing the power of good bacteria to transform coconut milk into a tangy, creamy treat. [6] For many, the ability to control the ingredients and cost makes this DIY approach incredibly appealing. [7]
The Two Magic Ingredients
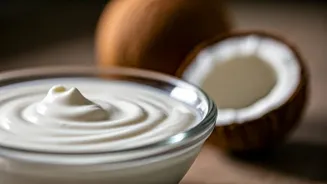
The recipe's beauty is its brevity. The first, and most crucial, ingredient is full-fat canned coconut milk. [8] Quality matters here; for the thickest, creamiest texture, it's best to use a brand without too many additives like guar gum, though some find it helps with consistency. [2, 10] The goal is to use the thick cream that separates from the water in the can. To ensure this separation, many bloggers recommend chilling the can in the refrigerator overnight. [6, 9] The second ingredient is the 'magic': probiotic capsules. [1] These capsules contain the live active cultures, specifically strains like Lactobacillus, that are needed to ferment the coconut milk. [5] You simply open a capsule and pour the powder inside, kick-starting the yogurt-making process. [3]
Your Step-by-Step Guide to Perfection
First, ensure your equipment is clean. Sterilizing your glass jar or bowl with boiling water is a good practice to prevent unwanted bacteria from growing. [5] Next, open your chilled can of coconut milk without shaking it and scoop out the thick, solid cream into your jar, leaving the coconut water behind (you can save it for smoothies). [9] Then, open one or two probiotic capsules and empty the powder into the coconut cream. [1] It’s often recommended to use a wooden or plastic spoon to stir, as metal can sometimes react negatively with the live cultures. [3] Mix until the powder is fully incorporated and the cream is smooth. Cover the jar with a breathable material like cheesecloth or a thin tea towel and secure it with a rubber band. [3]
The Art of Fermentation
Now for the hands-off part: fermentation. The yogurt needs to sit in a warm, dark place for 24 to 48 hours. [12] The warmth allows the probiotics to multiply and culture the milk, developing that signature tangy flavor. [11] A popular and effective trick is to place the jar in an oven with only the light turned on (do not turn the oven on). [6] The gentle heat from the oven light creates the perfect environment. [5] After 24 hours, you can start tasting it. The longer it ferments, the tangier it will become. Once it reaches your desired level of tang, give it a stir, put a proper lid on it, and transfer it to the refrigerator. Chilling is essential, as it will thicken the yogurt considerably, often to a Greek yogurt-like consistency. [3]
Troubleshooting and Pro Tips
Sometimes, things don't go perfectly. If your yogurt comes out thinner than you'd like, it could be due to the brand of coconut milk used. [11] You can try chilling it longer or, next time, use only the thickest part of the coconut cream. [2] If you notice separation, a simple stir will usually bring it back together. [2] However, if you see any mold or it develops an 'off' smell, you must discard it and start over. [10] This can happen if your jar wasn't clean or the environment was too hot. [2] For a guaranteed thick result, some recipes suggest adding a natural thickener like a touch of gelatin or agar-agar powder, though this moves beyond the classic two-ingredient method. [4, 8]