

Start with a Plan
Before you start hammering nails, a well-thought-out plan is crucial. Consider the size and shape of your wall. Think about the existing furniture and how
the photo arrangement will complement it. Sketch out different layouts on paper or use software to visualize the final display. Do you prefer symmetry or a more eclectic arrangement? Symmetrical arrangements often create a sense of order and balance, while asymmetrical arrangements can inject personality and a more relaxed feel. Factor in the size and shape of your frames, ensuring they are cohesive or create a visually interesting contrast. Consider the overall style of your home – is it modern, classic, or bohemian? Let your interior design aesthetic guide your planning process, and consider creating a focal point to draw the eye.
The Grid System
The grid system is a timeless technique that offers a sense of order and consistency. This method involves arranging photos in a neat grid pattern, using equal spacing between each frame. This works best when frames are similar in size or shape. Measure your wall space and calculate the optimal grid size, considering the frames and the desired spacing. Use painter's tape to mark the placement of each photo before committing to hammering nails. This will allow you to adjust the layout until you achieve the desired effect. This technique is particularly effective in hallways or entryways, where a symmetrical arrangement can create a welcoming atmosphere. Ensure all the frames have uniform spacing and that they are all aligned horizontally and vertically, creating a clean and polished appearance.
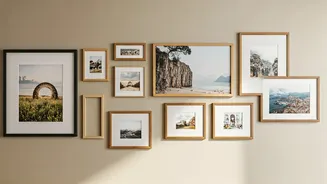
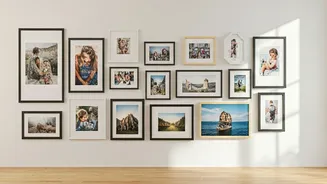
Gallery Wall Magic
A gallery wall is a collection of photos arranged in an intentional, curated manner. This is where you can showcase a variety of sizes, frame styles, and even artwork. Start by collecting your chosen photos and frames. Lay them out on the floor before you hang them to get a sense of how they'll look together. The key is to create a visual balance. You can achieve this by distributing heavier, larger frames with smaller ones or using a common color theme to tie everything together. Don't be afraid to mix and match frame styles – a combination of wood, metal, and ornate frames can add visual interest. Create an organic layout, allowing some photos to overlap slightly, which adds to the gallery wall's unique charm.
Play with Spacing
The spacing between your photos is as important as the photos themselves. Too little spacing can make the display look cluttered, while too much spacing can make it feel disconnected. Experiment with different spacing to find the sweet spot. For grid arrangements, use consistent spacing, usually 2-3 inches between frames. For a gallery wall, vary the spacing according to the arrangement. Consider the size of the photos – smaller photos might need less space, while larger ones can handle more. Spacing also influences the overall feel. Tight spacing creates a more cohesive, intimate feel, while wider spacing can give a sense of openness. Use painter’s tape to help maintain consistent spacing before you begin hammering nails, allowing you to test out different arrangements.
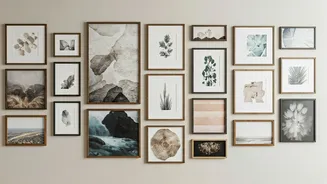
Consider Colors & Themes
Choosing a color scheme or theme can greatly enhance the overall impact of your photo display. Opt for a unifying color palette to tie everything together. Perhaps you choose black and white prints or select frames that complement your wall color. Alternatively, you can use a thematic approach. If you have travel photos, for instance, you can group them by location or create a timeline. Think about the emotions you want to evoke. Warm tones such as reds, oranges, and yellows create a cozy atmosphere, while cooler tones, like blues and greens, can create a calming environment. Make sure the photos and frames complement each other and the existing decor. The theme can also be reflected in the frame style, using similar or complementary designs to reinforce the narrative you're telling.