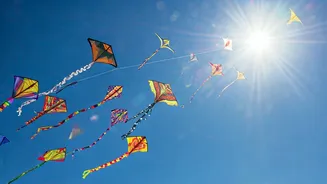


Traditional Diamond Kites
The classic diamond kite is a timeless favourite, representing simplicity and elegance. To build one, you’ll require two lightweight wooden dowels (bamboo
skewers work well, too), kite paper or colourful tissue paper, glue, string or kite cord, scissors, and decorative elements like markers or crayons. First, create a diamond shape with the dowels, securing them with glue or tape at the intersection. Next, cut the kite paper to slightly larger than the frame, and glue it to the dowels, ensuring it’s taut and without wrinkles. Trim any excess paper. Add a tail using strips of colourful paper or ribbons for stability and visual flair. Finally, attach the kite string to two points on the kite's frame. This traditional design is a fantastic starting point, easy to make, and offers endless opportunities for customization with various colours and patterns. Remember to choose a breezy day to launch your diamond kite and enjoy its graceful flight.
Box Kite Creations
Box kites, known for their stability and impressive lift, bring a unique dimension to kite making. You'll need four dowels (or skewers), four square pieces of lightweight paper or fabric, glue, string, and decorative elements. Begin by constructing a cube-like frame by connecting the dowels with glue or tape. Then, attach a paper or fabric panel to each of the four sides of the cube, ensuring it is neatly secured. Reinforce the seams to hold it steady when the wind blows through. Add bridle lines—strings that attach to different points of the kite and converge at a central point where the flying line is attached—to balance the box kite and control its angle to the wind. Decorate the box kite’s sides to make it stand out against the sky. Box kites are usually more complex but provide amazing lift, offering an exciting challenge for kite makers, ensuring a visually striking sight in the sky.
Delta Kite Designs
Delta kites, recognized by their triangular shape, are relatively simple to build and offer excellent performance. For a delta kite, you need a single central spar (a longer dowel or skewer), two shorter spars, kite paper or fabric, glue or tape, kite string, and decorations. Start by forming the delta shape, attaching the two shorter spars at an angle from the central spar. Then, carefully cut a piece of kite paper or fabric to cover the frame, leaving room for a folded edge to secure it. Glue or tape the fabric to the spars, making sure it’s taut. Add a bridle – a string that runs along the sides of the kite to the front for stability and control when flying. Add a tail to the bottom for better flight characteristics. Delta kites are known for their easy handling and beautiful flight, making them perfect for beginners and seasoned kite enthusiasts alike. They are also easily customizable with various colours and designs.
Fishtail Kite Crafting
Fishtail kites, with their distinctive shape, bring a touch of whimsy to the sky. To build a fishtail kite, gather lightweight materials such as dowels (or skewers), thin plastic sheets or kite paper, glue or tape, string or kite cord, and decorative materials. Start by creating a frame that resembles a fishtail design. You'll need to bend and shape the dowels and attach them together to define the structure of the kite. Cover the frame with kite paper or plastic, carefully adhering it to the frame with glue or tape. This is where the fishtail design starts to take shape. Add fins or other decorations to enhance the fishtail appearance. Add a bridle and tail to improve stability. Fishtail kites offer a playful visual experience, offering a unique appearance in the air. These kites add an engaging twist to your kite-flying experience during Makar Sankranti.
Cellular Kite Projects
Cellular kites, known for their complex and impressive designs, are perfect for those who enjoy a bit of a challenge. You will need multiple rectangular cells made from light-weight materials, dowels (or skewers) for framing, kite paper or fabric, glue or tape, kite string, and decorating supplies. Construct several identical cell units, using the dowels to form the basic framework of each cell. Cover each cell with kite paper or fabric, securing the material carefully to the frame, ensuring that the finished appearance is neat and strong. Join the cells together in a pattern or design of your choice. A common design is a line of cells, or a stacked structure. Connect them with string or tape to create the overall kite shape. Attach a bridle for balance and flight, and decorate the individual cells with a creative flair. Cellular kites are visually striking and perform impressively in the wind, making them a conversation starter in any kite-flying session.
Train Kite Creations
Train kites, consisting of multiple connected kites, are a spectacular sight in the sky. To make a train kite, you’ll need several individual kite units (like diamond or delta kites), dowels or skewers, kite paper or fabric, glue or tape, string, and decoration materials. Build several individual kites of the same design or combine different types for visual variety. Ensure each kite is complete. Join the kites together with string or kite cord, ensuring there's a small space between each one to allow for optimal wind capture and flight. Add tails to the last kite of the train to provide additional stability and visual appeal. Decorate each individual kite, ensuring they contribute to the overall aesthetic of the train. Train kites offer a unique and customizable kite-flying experience. They are great for creating a colourful and engaging display, turning any kite-flying session into a grand spectacle.
Mini Kite Fun
Mini kites are the perfect project for kids and beginners, offering a quick and easy way to experience the joy of kite making. For mini kites, you'll need small dowels or skewers, lightweight paper or plastic, glue or tape, string or kite cord, and decorations. Cut the dowels to smaller sizes, suitable for the mini dimensions. Assemble the kite frame in a diamond or delta shape. Cover the frame with kite paper or plastic. Attach the kite string for flying. Add a small tail if you wish. Decorate the mini kites with bright colours or drawings to make them visually appealing. Mini kites are perfect for beginners, making it easy and accessible for children and adults. Mini kites ensure that everyone can enjoy a successful kite-flying experience, fostering creativity and providing instant satisfaction.
Kite Decoration Ideas
Adding decorative flair to your kites elevates their visual appeal and enhances the festive spirit. For kite decoration, gather markers, crayons, paint, glitter, stickers, colourful paper, ribbons, and anything you can find that helps with creativity. You can use markers or crayons to draw your own designs on the kite paper or fabric. Cut out shapes from coloured paper and glue them onto the kite. Attach stickers with bright designs and patterns. Add glitter for a shimmering effect. Make tassels or streamers from colourful ribbons to attach to the tail. Incorporate reflective materials for night flights. Kite decoration offers endless possibilities to personalize your kite. Use any decorative technique or materials you prefer to create a kite that is uniquely yours, celebrating the creative spirit of Makar Sankranti.