
Wingin’ It is BACK! My first ever recipe came against the Baltimore Ravens in Week 1 of 2018 where I made a “Chicken Box” to assert our wing dominance. Seven years later, almost to the day, and here I am innovating
again. I bring you my first non-food recipe.
The universe was pushing for this. There’s been a running gag in my football group about us doing some sort of themed super fan costume set. I’ve always maintained I have a gimmick to uphold. This offseason my sister asked AI for a group idea and lo and behold it came back pushing a spooky theme. The universe and AI were nudging me toward fulfilling my gimmick. Sure, I may be Jeff. I’m also Skarekrow. Thanks to the nudge, the “other guy” is ready for his reemergence. If you’re at the Ravens game, maybe you’ll see me.
I’ll be easy to find. Just look for the dead lights. One, two, Skarekrow’s coming for you…
Skarekrow Dye
Makes: Variable as you’ll see
Active Time: 10-20 minutes
Total Time: 10 minutes to two weeks depending on some pointers you’ll get here shortly
Ingredients
Water
Walnut husks
Rusty nails
Vinegar (optional)
You may need: Mask to prevent inhalation risks, tetanus shot (just in case), sandpaper, bucket(s), non-synthetic fabric to dye, old clothes in case you splash dye on yourself
- Put water in bucket (for all of these steps, see tips below for each article of clothing I did to get an idea of quantities, times, etc.).
- Put small chunks of walnut husks in bucket.
- Put rusty nails in bucket (see tips for iron acetate below for darker dye).
- Shake bucket.
- Wait between 10 minutes and overnight.
- Use dye on desired (non-synthetic) fabric.
- Leave fabric in dye until desired color is achieved.
- Allow fabric to dry.
- Rinse fabric until water runs mostly clear.
- If able to do so safely, launder normally (canvas pants yes, burlap mask, no).
Wingin’ It Tips and Prep Gallery
This is honestly really, really, really easy. Black walnuts on their own create a strong and pretty permanent dye for fabrics like cotton. Most of the below is just variations on quantities and concentration for desired effect.
The mask


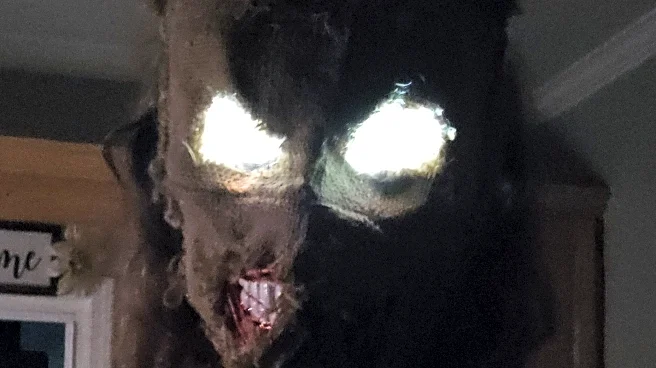
I bought the pictured red chrome mask on clearance years ago thinking I might wear it to hand out candy. I’m the “nice guy” candy giver and try not to scare kids though so the mask has been in storage for some time. After the idea spark (see below for concept designs) it came up from the basement and right into the nightmares of Ravens fans. As a heads up, I saw this exact same mask on sale this year again.
The first image after the raw mask was right after attaching the burlap. Then I decided I needed a paint marker to make the teeth white. The following two pictures show the first stage or dyeing and the second when I decided I wanted it darker. The rest are details photos. Yes, the eyes light up like Stephen King’s dead lights.
For the dye, this was strictly a few cups of water, chopped up walnut husks, and two rusty nails sitting around for a couple of hours on the first batch. It wasn’t dark enough, so I added more walnut husks and let the dye sit longer. Knowing that washing burlap is a DISASTER and that the worst case is a rain game that bleeds walnut dye on clothes that are also dyed, I dabbed this one with paper towels. Just enough to saturate the burlap but not drown the mask. Burlap darkens very well as it turns out, so I didn’t have to do what I did for the pants.
If you want an idea of quantity of ingredients for the mask dye, here’s a video of me mixing/crushing in the bucket. I used the same process for other burlap elements you’ll see later. As for timing of the dye, as noted it’s technically still setting as I never washed it out.
The pants
For the pants, we’re going to start talking about iron acetate rather than just iron (the rusty nails in the mask dye). But first, here’s a video of me mixing the dye the night before I used it. As opposed to the mask, I allowed the dye to mix for longer and used many more walnut husks. I wanted a significant shift in the coloration, and I wanted it to be colorfast.
Now for some pictures!


The pics show the dye after sitting overnight and after I mixed in some WEAK iron acetate. Next up is the pants and their original color, then after dyeing and marking up a bit with some MEDIUM iron acetate. The 13 on the pocket was done with the medium iron acetate and rust. I want to draw your attention to the paper towels to discuss iron acetate.
Both paper towels had a walnut husk circle impressed on them. On the one with the black streaks, I dipped a knife tip in the weak iron acetate and pressed it in the circle. The specific knife I used has a magnetic tip and you can see that because it pulled the iron into the shape of the knife tip. This picture was taken immediately after I did this, which is how quickly the iron is a catalyst for the walnut.
Skare, what the heck is iron acetate? I won’t dive fully into the chemistry since you clearly have the internet and can look it up if you want. The short version is that for our purposes, iron acetate does two things to walnut dye. It darkens the **** out of it, and it makes it more colorfast. Iron itself will act similarly, but weaker.
Cool, how do I get/make some? With the mask, I used rusty nails to impart some iron into the water. A teeny tiny bit, mostly for color. It browns the dye faster than nature taking its course. If I take those nails and let them sit in distilled vinegar, it will start to create iron acetate. This is where a mask is a good idea as it does create some gas byproduct. And by “mask” in this instance, I mean something to cover your face to protect your lungs, not the burlap one I made. You can speed things up by using sandpaper to get rust and iron dust to put into the vinegar. You do not want to inhale those things.
The images speak for themselves. The pants’ main dye was the walnut/water mixture with about a half cup of vinegar that had nails in it for 12 hours to produce a weak acetate. I let the pants sit in the dye for about four hours. Afterwards I hand wrung them, and let them dry in the sun.
I wanted to mark the pants up to give some more character to them and that’s where a medium strength iron acetate mixture came into play. I used iron/rust dust and just a little vinegar to make paste, which allowed me to mark things specifically, like drawing the 13. I have put these through a machine wash cycle and what you see above is still accurate.
The gloves
The gloves are leather, which means dyeing them is a lot harder. So I needed something stronger.
What you are looking at is a much stronger iron acetate. I used half a cup of vinegar, a few nails, and a whole lotta rust for this. I also let it sit for over a week. You can see what happens to the walnut the second things mix. A very intense, and very permanent black dye. This goes for the entire article, but it’s not a bad idea to wear clothes you don’t give a crap about.
For the gloves, you’ll see that I used a little fire to get the numbers in and add to the aging look. The dye was a tougher sell on the leather. The pictures show a pretty “just did an oil change” kinda look, but the final result after washing them is more subdued/aged. Yes I put them in the washer and dryer. What was the worst that could happen? They start to look a little worn and falling apart?


The jersey
Last but not least is the jersey. Do you remember how four seconds ago I said the walnut dye had trouble with the leather, and how a few times now I’ve said “non-synthetic” fabric for use? NFL jerseys are a big ol’ pile of polyester. I tried a dab of straight up walnut just for funsies and yeah, it did nothing. For the look I wanted I did need to turn to commercial products.
In the first picture you can the remnants of the color I went with; RIT’s Chocolate Brown meant for synthetic fabrics. I teased the NFL shield on social media, and the fabric around it almost looks like a Ravens jersey. The color, which I’m calling “Nightmare Blue” is definitely not purple and is highly dependent on the lighting. In the pics below, you can see it shift from “Ravens” to “hard to tell it’s not a regular Bills jersey in the wrong lighting.”
The best idea of it comes from the side by side with the untreated jersey. This was the last time my Stevie Johnson and Ryan Fitzpatrick jerseys were together. Afterwards, the #13 became Skarekrow. Sorry Stevie, I did warn you on Twitter and I hope you’re:
a. Seeing this
b. Happy with how it turned out