


Hey everyone, if you were intrigued enough the first time to walk with me on the path of the Mandalorian (wannabe), I’m back with a little more on the project. If you’re just joining us the short recap is that a friend of mine bought us Black Series Star Wars helmets and we’re making them Bills themed. I, of course, am making Buffalo Rumblings readers suffer through my overly convoluted process.
Paint selection
In Part 1, I ended with the images below. The Sabine Wren, Nite Owl style helmet with a taped visor and
ready for some slight scuffing and painting along with my rough sketch of half the helmet design. I also gave a concept choice that I wanted the final product to look like I inherited or found an “antique” helmet and made it my own. Why “antique?” Well, the events of Star Wars do happen a long time ago in a galaxy far, far away.


If you look at my concept drawing you can maybe tell that my idea was to keep the lower portion of the helmet looking like beskar/steel. That vibes with Sabine Wren’s original design and I felt it would be a good tribute to that. That said, the factory paint would in no way match what I was doing with the rest (you’ll see what I mean below when I talk Bills colors). That meant I needed to find a metallic paint that matched what I wanted.
Lucky for me, Krylon makes a style of paint called “Hammered.” Yes, that makes sense in a lot of ways for Bills fans. For our purposes here though it’s paint that when dried will resemble metal that’s been hammered into shape, still showing some marks from the tooling. This is their pewter color. The idea was to antique the look as if it has seen untold millennia slip by. Beskar is near invincible but I wanted it to look like Father Time will eventually be undefeated. Here are test pieces I did (battery cover on back of helmet, and the push button on the range finder component).

All I had to do is spray the paint. That’s texture and uneven coloration in a single can. Even better, it holds the texture even when different paint is applied. Here’s the same battery cover after a coat of red.

The pitting and texture holds up, so the entire helmet should still give the antique/corroded over time look, even with my color scheme applied.
I decided to go with a gloss red and white, nothing inherently fancy on them as they’ll mostly be accent colors. I say that, because the blue is going to dominate the top half of the helmet. For that, I wanted to go metallic.

This is a very thin coat and you can see that the deeper pits still show tiny bits of pewter. I’m not unhappy about that at all but we’ll see if I aim for that or a more even/thorough coat when I get rolling. But enough about the paint itself. I had one more thing to test before I took the leap and started spraying.
Stenciling
I’m going to be hand drawing and stenciling the “swoosh” from the charging buffalo logo but I needed to make sure that I had a way to prevent paint bleed (we’ll see how well I can draw later in the project). For that, I bought a premium version of painter’s tape which was still shockingly affordable (you’ll find out juuuuust how much of a cheapskate I wanted to be for this next chapter). Frog Tape, which promises ultra-low bleed and residue from the tape itself was the selection.
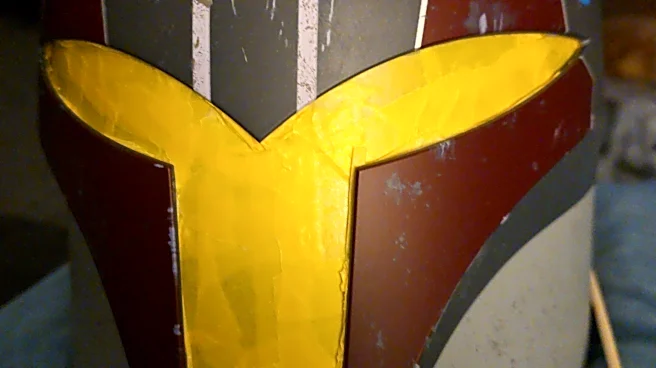
To test it, I decided to do a mock up of what’s going to adorn the left side of the helmet. If you watch The Mandalorian you remember that the mythosaur belongs to all Mandalorians, regardless of clan. That said, I do have a clan affiliation. Can you guess what I did based on the picture below?

Did you guess what it is? It’s a bison skull but with downward horns like the Mythosaur sigil. I promise I will take way more time on the helmet version.
This was hastily done to test two things. Will the Frog Tape give me clean edges, and will it allow for fine detail? This entire design is much smaller than the final will be. I taped, drew, razor knifed, and painted this all in under half an hour. That includes painting the white horns, then carefully taping over the fresh paint so I could do the red (hence a few blemishes and a little bleed over from the red).
Speaking of the helmet…
I have one more thing for you in this one. The shell gone pewter.

That last picture might be where most people would leave off. Looks cool, everything is pretty clean looking.
Yeah, well I screwed up on the other side. I had a small imperfection in the coloring and tried to do another coat to even it out. I wanted a thin coat and got a thick coat. That led to wrinkles and runs. A week of allowing it to cure and sand, cure and sand, cure and sand later and… well you’ll get to see how well I fixed it. You’d think I learned a valuable lesson about patience. I likely haven’t.

For the record, this massive issue was very easy to create. All it took was one extra blast of paint at the wrong time and a little extra pressure on the trigger. This paint stays tacky for a long time so I’m not kidding when I say it took a week of sanding to prep it for the fix. Thin layer off, let the tacky remnant cure, thin layer off, repeat.
I mention this because you might be tempted to customize your own stuff. Stumbles happen. Part of my stumbles occur when I get impatient and don’t want to stop working on a project. The next chapter is going to dive into a way I’m trying to keep myself occupied during stages when I should be letting helmet paint dry.