


Kulfi Base Creation
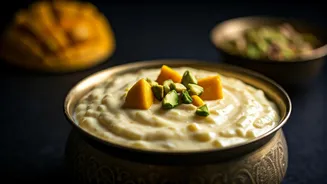
Begin by preparing the heart of your falooda: the kulfi. In a sturdy saucepan, bring full-cream milk to a gentle boil. Once boiling, reduce the heat and
let it simmer, stirring regularly to prevent scorching. Continue this process until the milk has reduced by approximately half its initial volume, achieving a noticeably thicker consistency. At this stage, incorporate sugar for sweetness, fragrant cardamom powder for aroma, saffron soaked in a little milk for colour and flavour, and optionally, clotted cream or mawa for enhanced richness. Stir everything thoroughly until the mixture is smooth and creamy. Allow this kulfi base to cool completely before carefully pouring it into individual kulfi moulds or small serving glasses. Cover these containers securely and place them in the freezer for at least six to eight hours, or preferably overnight, ensuring they are firm and fully set.
Falooda Sev Preparation
Next, attend to the falooda sev, the delightful noodle-like component that adds texture. If you are using dried rice vermicelli-style falooda sev, cook it in boiling water for a brief two to three minutes until it softens. Immediately after cooking, drain it thoroughly and rinse it under cold running water to stop the cooking process and prevent sticking. For falooda sev made from cornflour, the preparation involves soaking it in chilled water for about ten to fifteen minutes until it becomes pliable. Once soaked, drain it well and set it aside. An optional yet flavour-enhancing step is to briefly soak the prepared sev in a small amount of milk infused with a hint of rose syrup, which adds an extra layer of fragrance and sweetness.
Soaking Sabja Seeds
The subtle yet crucial element of sabja seeds, also known as tukmaria, needs careful preparation. In a small bowl, combine the sabja seeds with about three to four tablespoons of water. Allow these tiny seeds to sit undisturbed for approximately fifteen to twenty minutes. During this time, they will absorb the water and swell significantly, transforming into a gelatinous, translucent state. Once they have reached this desired consistency, carefully drain off any excess water that remains, ensuring only the plumped seeds are left. Set these prepared sabja seeds aside, ready for the final assembly of your Kulfi Falooda.
Assembling Kulfi Falooda
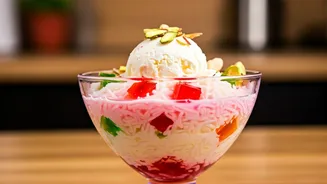
Now, the exciting part: assembling the Kulfi Falooda into a beautiful, layered dessert. Select your serving glasses and begin by placing one teaspoon of the soaked sabja seeds at the bottom, followed by half to one tablespoon of rose syrup. Next, add a layer of the prepared falooda sev, and then introduce one to two tablespoons of chilled milk or rich rabri. Carefully cut the firmly frozen kulfi into small, manageable cubes and place two to three of these cubes on top of the milk layer. Continue this layering process: repeat with sabja seeds, rose syrup, falooda sev, and chilled milk or rabri. Finish the assembly by placing a final kulfi cube on the very top. To enhance its visual appeal and flavour, drizzle a little extra rose syrup over the top and generously sprinkle with chopped pistachios and almonds.
Serving and Enjoyment
The final step is to serve and savour your homemade Kulfi Falooda. It is best enjoyed immediately after assembly, while the kulfi cubes are still perfectly firm and the falooda sev retains its delightful springy texture. To truly experience all the integrated flavours and textures, it is recommended to serve the Kulfi Falooda with a long-handled spoon or a straw. This allows the diner to mix the various layers together as they eat, creating a harmonious blend of creamy kulfi, tender sev, sweet syrup, and refreshing sabja seeds in every spoonful. This dessert offers a truly indulgent and cooling experience, perfect for beating the heat and delighting guests.