


Crafting The Base
To begin your delightful no-bake mango cheesecake, focus on creating a firm and flavourful foundation. This involves gathering about 2 cups of crushed
digestive biscuits or graham crackers. These dry crumbs should then be thoroughly combined with 100 grams of melted butter, ensuring every particle is coated. For a touch of sweetness and better binding, mix in 2 tablespoons of powdered sugar. Once these components are well integrated, the mixture is ready to be pressed firmly into the base of a prepared springform cake tin or a loose-bottomed pan, which should ideally be lined with parchment paper. Achieving an even layer is key, so use the back of a spoon or a glass to compact the mixture. After shaping the base, place the tin in the refrigerator for approximately 20 to 30 minutes, allowing it to set and firm up before the luscious filling is added.
Silky Mango Filling
The heart of this dessert lies in its vibrant and smooth mango filling. Start by preparing about 2 ripe mangoes, peeling, chopping, and then blending them into a fine puree. For an exceptionally smooth texture, consider straining this puree. Next, take 250 grams of softened cream cheese and whisk it in a large bowl until it achieves a perfectly creamy consistency, free from any lumps. Into this, incorporate ½ cup of condensed milk, 1 teaspoon of vanilla extract, and 1 tablespoon of lemon juice, mixing thoroughly to ensure a homogenous blend. Gradually fold the prepared mango puree into the cream cheese mixture until everything is smoothly combined, creating a beautiful creamy and fruity base for your filling. For an airy texture, whip 1 cup of fresh cream or whipping cream separately until soft peaks form, then gently fold this whipped cream into the mango-cream cheese blend. Finally, to ensure the cheesecake sets properly, bloom 1 tablespoon of gelatin powder in 3 tablespoons of warm water for a few minutes, then gently heat it until fully dissolved. Slowly incorporate this dissolved gelatin mixture into the main filling, stirring continuously to distribute it evenly.
Assembly & Chilling
With both the base and filling prepared, the next crucial step is bringing them together and allowing the magic of chilling to transform them into a delightful dessert. Carefully pour the prepared mango cheesecake filling over the pre-chilled biscuit base within the springform tin. Use a spatula to gently spread the filling evenly across the base, ensuring a smooth surface. A light tap on the pan can help to release any trapped air bubbles, contributing to a cleaner finish. Once the filling is evenly distributed and smoothed, the cheesecake requires adequate time to set. It's essential to refrigerate the entire dessert for a minimum of 6 to 8 hours, or ideally, overnight. This extended chilling period is vital for developing the perfect texture and allowing the flavours to meld beautifully. Rushing this step will compromise the cheesecake's firmness and overall appeal.
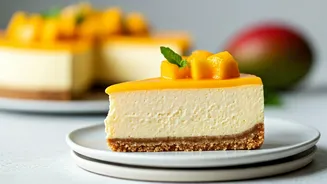
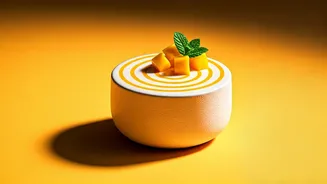
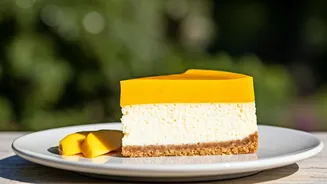
Garnish & Serve
The final flourish to your no-bake mango cheesecake involves presentation and serving. Once the cheesecake has fully set and achieved its desired firm texture after its lengthy chill, it's time to add the decorative touches that enhance its visual appeal and tropical flavour profile. Prepare some fresh mango cubes for scattering over the top of the cheesecake. A drizzle of extra mango puree can add another layer of fruity intensity and visual interest. For a pop of colour and a refreshing aroma, a few fresh mint leaves make an excellent garnish. This combination of fresh fruit and delicate herbs elevates the dessert from delicious to truly spectacular. Serve your creation chilled, allowing your guests to savour the creamy, fruity, and utterly irresistible taste of this homemade tropical indulgence.