







I love everything about the holidays, from picking out the Christmas tree and decorating to baking cookies and seeing what our Elf gets up to. And while absolutely love Christmas lights, I hate the process of actually putting them up. It always takes an entire afternoon, and the take down is a drag (mostly because January in Minnesota ifs not the time to be outside).
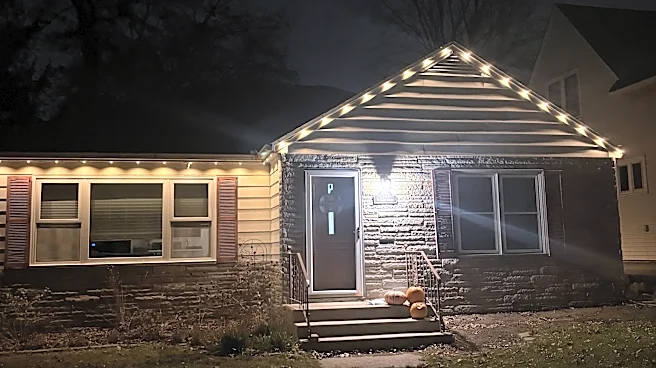
So this year, we decided on a more permanent solution and took the step to install year-round lights. It's been about a week since we've had them up, and they look incredible. We've gotten so many compliments from our neighbors, and many people have asked if we got them done professionally.
Our biggest secret? Installing our outdoor lights from Enbrighten only took a few hours, and
it was so easy to do. Here's how to install permanent outdoor lights, and a few tips and tricks we learned along the way.
What are permanent outdoor lights?
Permanent eave lights are more than just Christmas lights, they're year-round lights that keep your home lit regardless of the season. They can change colors or patterns as often as you like, and you can program them to your preferred colors.
“We built a premium permanent lighting system that looks just as purposeful on an ordinary Tuesday as it does during the holidays,” said Jeff Cato, chief marketing officer of Enbrighten. You can make your lights red and green for the holidays, orange and purple for Halloween, and a soft white the rest of the year.

Enbrighten Eternity permanent outdoor lights
Install permanent outdoor lights so that you can enjoy them year-round.
Buy your permanent lights now
What you need to install permanent lights
The most important tools you need are your outdoor light kit with hardware, a ladder and a drill to install the lights. But your full list should include:
- Extension ladder or step ladder
- Tape measure
- Pencil or removable marker for marking placement
- Drill/driver and corresponding drill bits
- Cleaning cloths or microfiber rags
- Exterior-rated extension cord (if needed for your power location)
- Outdoor-rated cable clips or fasteners (if needed for cord management)
- Work gloves
- Enbrighten Eternity Eave Lights kit and included mounting hardware
- Smartphone for setup and control
- A helper (or two)

How long does it take to install permanent outdoor lights?
It took two people three hours to install about 125 feet of permanent outdoor lights, plus an extra 45 minutes with just one person to prep. This roof was only a single story and didn't have very steep rooflines, so if your roof is more complex, it might take you longer.
How to install permanent outdoor lights
We were so surprised by how easy it was to install these lights. Start by planning your install and prepping the area, then drill the hardware in and snap the lights into place.
1. Plan where your permanent lights will go
Buy your lights now
The first step (and one I will say we accidently skipped) is to plan out where your lights will go. Your first consideration should be where your power source is, otherwise you'll end up like us and need to buy a new extension cord to reach the outlet.
Measure your eaves and map out enough lights to make it around your desired area. It might help to lay out your lights where you plan to hang them, but you can also just measure to make sure you have enough lights for your roofline.
2. Prepare the eaves
To prepare the eaves, use a clean cloth to wipe down the eaves and soffits. You can also wipe the surface down with rubbing alcohol so that the hardware adheres better.
3. Position the first section of lights
Now that you're ready to get your lights up, plan the first section of lights. It helped us to use a tape measure and pencil to mark were we wanted our lights to go. That helped us keep a consistent distance between each light.
The lights should be between 2 and 4 inches out from the wall for the proper scalloped effect.
4. Attach the permanent lights
Attaching the lights requires peeling back any adhesive and screwing the hardware into place. I would definitely recommend doing both so that your lights stay attached.
We did about three feet of hardware at a time and then snapped the lights into place before moving on to the next section. I did like this method, as it make sure we kept consistent distance between our lights. You could do something similar, or get all the hardware up before putting the light strand up.
When you're all done, you cut off the lights you didn't use.
5. Work around corners and architectural features

Corners are probably the trickiest part of installing permanent outdoor lights. We used an "L" shape where a light was at each tip so that it didn't disrupt the pattern.
6. Connect and test the system and set up the smart controls
When you've finished installing, all you have to do is plug them in and install the app. Using your app, you can choose the pattern of lights, colors and set timers for when you want them on or off.
7. See what the finished permanent lights look like
We could not be happier with how these lights turned out. We set them to go on at dusk and turn off after day breaks.
What I learned from installing permanent lights
As with any DIY project, we learned a lot from installing permanent lights ourselves. First and foremost, I'd recommend you plan your power connection before you start your installation. That way, you won't end up like us and have to run and grab a new extension cord after we finished.
Other tidbits we learned from doing this weekend project:
- Don't wait until the whole system is installed to test it. It occurred to us halfway through that we should plug the lights in before we put them up, just in case they didn't work. Thankfully, this was not an issue for us.
- Recruit a second person. At first, my husband was doing all the labor himself. But after about an hour, we called in a second person and the installation went much faster.
- Measure your roof ahead of time. We got 150 feet in hopes that was enough, which it was. But there was a point where we were worried we wouldn't have enough lights to go around.
- Get some good work gloves. The temperature dropped to 40 degrees the weekend we installed our lights. While our hands were a little bit cold, some work gloves would have made the install a bit more pleasant.

Who should install permanent outdoor lights?
Enbrighten Eternity permanent outdoor lights
Install permanent outdoor lights so that you can enjoy them year-round.
Buy your permanent lights now
I might be biased because I love my lights, but I think every homeowner can benefit from installing some of these. Permanent outdoor lights are particularly good for:
- Anyone who puts up annual Christmas lights
- Homeowners who want to change light colors with the season
- People who live in the country and don't have street lights
This article originally appeared on USA TODAY: We DIYed Enbrighten permanent lights. Here’s what we learned
Our editors independently choose our recommendations. Some content is produced with paid support from a third party, however our editorial decisions remain independent. If you buy through our links, the USA TODAY Network may earn a commission. Prices and availability may change.