







The Foundation: A No-Sew Tunic
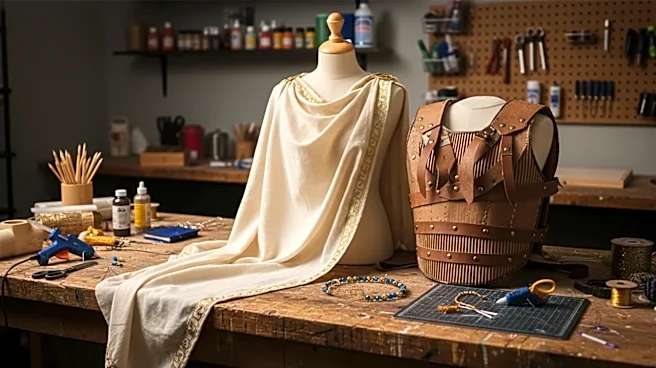
The core of any ancient Greek look is the tunic, or chiton, and you don't need to be a tailor to make one. An old white or off-white bedsheet is the perfect starting material. For the simplest version, fold a large rectangular piece of fabric in half
and drape it over your body. You can pin it at the shoulders with decorative brooches or even stylish safety pins. Another popular method involves taking a long piece of fabric, wrapping it around your back, bringing one corner over your shoulder, and wrapping the rest of the fabric around your torso before tossing the end over the same shoulder. Secure it all with a rope or fabric belt at the waist. If you want a two-piece look, you can create a simple wrapped skirt and a separate bandeau-style top. The key is to let the fabric drape naturally.
The Armor: Craft Foam Heroics
Movie-studio armor may be out, but impressive-looking armor is surprisingly achievable with EVA craft foam, a material found in any craft store. This lightweight, flexible foam is perfect for creating chest plates, bracers (forearm guards), and greaves (shin guards). Start by making a pattern out of paper to fit your body. Trace the pattern onto the foam sheets and cut the pieces out with a sharp craft knife. One of the secrets to making foam look like shaped metal or leather is a heat gun. Gently heating the surface of the foam allows you to bend it into curved shapes that it will hold once it cools. After shaping, seal the foam with a few coats of white school glue or Mod Podge mixed with water to prevent the paint from soaking in. Then, a base coat of metallic spray paint—gold, bronze, or silver—brings it to life.
The Straps and Belts: Faux Leather Finish
An Odyssey costume needs rugged-looking straps and belts to hold everything in place. You can create a convincing faux leather look using more craft foam or vinyl fabric. Cut brown or black craft foam into strips. To give it a leather-like texture, heat the foam gently and press it onto a crumpled piece of aluminum foil; this will imprint a random, organic pattern onto the surface. Paint the foam with brown and black acrylic paints to create depth. Alternatively, you can buy non-stretch faux leather fabric and cut it into strips. For a more robust strap, glue two strips back-to-back. These can be used to create a harness for your chest plate, secure your bracers, or as part of a wide warrior's belt.
The Footwear and Accessories: Finishing Touches
No Greek hero is complete without proper footwear and accessories. For sandals, you can easily modify a pair of basic flip-flops or flat sandals. Use hot glue to attach long strips of faux leather or wide ribbon to the existing straps. Wrap these strips up your calves and tie them just below the knee for an instant gladiator look. A simple gold-painted leaf crown, or laurel wreath, is another iconic accessory that's easy to make. You can find artificial leaves at a craft store and attach them to a headband or wire. For a prop, a simple sword or spear can be cut from cardboard or foam board and painted. Gold brads can be used to simulate rivets on belts and armor for an extra touch of detail.
The Weathering: Making It Look Lived-In
A hero returning from an epic journey wouldn't be wearing pristine gear. The final step to elevate your costume is weathering. This means making your costume look used, worn, and battle-tested. For fabrics, a light spray of watered-down brown or black acrylic paint in strategic areas can simulate dirt. You can also soak the fabric in strong tea or coffee to give it a universally aged, off-white look. For the armor, weathering is key. After your base metallic coat, use a technique called a "black wash" by brushing on watered-down black paint and quickly wiping most of it off with a cloth. This leaves the black paint in the crevices, highlighting details and creating an illusion of age and grime. A light dry-brushing of silver on the edges can simulate wear and tear where the armor would have been scuffed in battle.