
Pottery: An Introduction
Pottery, an ancient art form, offers a unique blend of creativity and relaxation. It involves shaping clay into functional or decorative objects using
various techniques. This beginner's guide aims to simplify the pottery process, providing clear instructions for aspiring artists. It emphasizes the therapeutic benefits of working with clay, allowing individuals to unwind and express their artistic flair. Pottery is not just about creating objects; it's a mindful process that enhances focus and provides a sense of accomplishment. The guide will cover everything from selecting the right clay to mastering basic shaping techniques, empowering beginners to embark on their pottery journey with confidence. Safety is also a key focus, ensuring a safe and enjoyable learning experience.
Essential Pottery Materials
The journey into pottery begins with understanding the essential materials needed. The core element is, of course, clay, which comes in various types like earthenware, stoneware, and porcelain. Each clay type has unique properties affecting the final product. Earthenware is known for its porous nature and is often the easiest for beginners. Stoneware is more durable and fires at higher temperatures. Porcelain offers a delicate, translucent finish, but can be more challenging. Besides clay, you'll need water, a sponge, and a sturdy surface to work on. Other important items include pottery tools such as a rib (for shaping), a needle tool (for scoring and marking), a fettling knife (for trimming), and a wire tool (for cutting clay). Glazes are vital for decoration and waterproofing, while a kiln is necessary for firing the clay, transforming it into a hardened, permanent form. Having these materials ready sets the stage for a creative and enjoyable pottery experience.
Mastering Basic Techniques
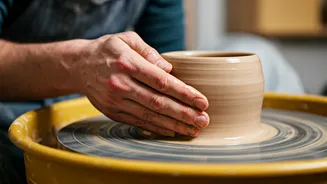
Several basic techniques form the foundation of pottery. Hand-building techniques, such as pinching, coiling, and slab construction, are excellent for beginners. Pinching involves shaping clay by squeezing it between your fingers, perfect for creating small bowls or cups. Coiling involves rolling clay into long ropes and stacking them to build forms, ideal for creating larger vessels. Slab construction involves rolling clay flat and using it to form shapes, suitable for creating boxes or other geometric objects. Wheel throwing, using a potter's wheel, is a more advanced technique but offers the advantage of creating symmetrical pieces. To begin, center the clay on the wheel, then open it and pull up the walls. This takes practice to perfect. For beginners, starting with hand-building techniques allows them to develop an understanding of the clay's properties before progressing to more complex methods. Each technique, from pinching to wheel throwing, provides a unique path to creative expression.
Safety First: Pottery Tips
Safety should be a top priority when working with clay. Always work in a well-ventilated space to avoid inhaling dust. Clay particles can irritate the respiratory system, so wearing a dust mask is advisable. Protective eyewear is another must-have to prevent clay particles from entering your eyes. Clay can be messy, so wearing an apron and covering your work surface will help maintain a clean workspace. When using the pottery wheel, ensure your workspace is free of obstructions and that you are seated comfortably. Keep the wheel and your hands clean to maintain hygiene and ensure the clay doesn't contaminate. Be cautious when handling sharp tools and keep them out of reach of children. When firing your work in a kiln, strictly adhere to the manufacturer's instructions for the kiln and glazes used, as improper use can be hazardous. By observing these safety tips, potters can create a safe, healthy, and enjoyable environment for their artistic endeavors.
Firing and Glazing Pottery
Once your pottery pieces are shaped and dried, the next essential step is firing them in a kiln. Firing transforms the soft clay into a hardened, durable material. The firing process involves gradually heating the clay to a specific temperature, depending on the type of clay used. This process hardens the clay and creates a permanent shape. Glazing is another crucial step, as it provides a decorative finish and makes the pottery waterproof. Glazes are applied after the initial firing and then fired again at a specific temperature. There are various types of glazes, each offering a unique look and feel. Before glazing, make sure your piece is clean and free of dust. Glazes can be brushed, sprayed, or dipped onto the pottery. Choosing the correct glaze for the clay type and firing temperature is crucial to prevent the glaze from cracking or peeling. Through firing and glazing, raw clay transforms into beautiful, functional, and decorative pieces.