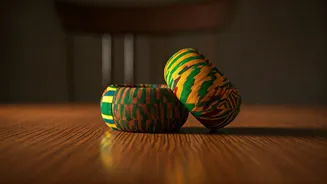


Gathering Your Supplies
Embarking on this creative project requires a few key items to bring your vision to life. You'll need colorful scraps of traditional Kente cloth, a reliable
pair of scissors for precise cutting, a strong adhesive like fabric glue or a suitable adhesive, and a set of plain ring bases, which can be made of wood or metal. The fabric pieces should be generous enough to fully encase each ring, ensuring a neat and complete finish. It's important to select an adhesive that securely bonds the fabric without causing any damage or discoloration. These materials are readily accessible at most craft supply stores or can be conveniently purchased online, making the project accessible to everyone looking to add a unique touch to their home decor.
Preparing the Fabric
The next crucial step involves skillfully preparing the Kente cloth for application. Begin by cutting small sections of the fabric, ensuring each piece is slightly larger than the ring base it's intended to cover. This extra margin is vital, as it allows the fabric edges to be neatly folded and secured around the circumference of the ring, creating a smooth and professional look. To enhance the visual appeal of your napkin rings, consider selecting diverse patterns from your Kente fabric scraps for each individual ring; this variety will introduce dynamic visual interest to your table setting. Take care to make clean, straight cuts to guarantee a polished final product that reflects the intricate beauty of the Kente textile.
Adhering Fabric to Rings
With your fabric pieces precisely cut, the focus now shifts to attaching them to the ring bases. Carefully apply a generous amount of your chosen glue or fabric adhesive to one side of a ring base. Next, meticulously position the prepared Kente cloth piece onto the glued surface, paying close attention to the alignment of the patterns to achieve the desired aesthetic. Apply firm, even pressure across the fabric to ensure it adheres securely to the ring. If any excess fabric extends beyond the edges, carefully trim it away to maintain a neat and tidy appearance. Repeat this process for each ring, ensuring each piece of Kente cloth is beautifully and firmly attached.
Ensuring Durability
The final stage of this DIY endeavor involves allowing adequate time for the adhesive to cure and secure the fabric. Once all the Kente cloth pieces have been attached to their respective rings, it is imperative to let them dry completely. Adhere to the drying time recommendations provided by your adhesive manufacturer for optimal results. This drying period is fundamental for ensuring the longevity and resilience of your handcrafted napkin rings, making them suitable for regular use during family meals or more formal gatherings. After the rings have fully dried, conduct a thorough inspection of each one. Gently check for any loose fabric edges and reapply adhesive as necessary to guarantee a secure and polished finish before they are placed on your dining table.