
Pressing Techniques Explained
Preserving flowers involves several methods, each offering unique advantages. The most common is the traditional method using a flower press, which is ideal
for flat, detailed specimens. This method involves placing flowers between absorbent paper and applying pressure. Books also work well, particularly heavy ones, but they may not offer consistent pressure. Another approach is to use a microwave, a quicker method suitable for drying flowers rapidly. However, it requires careful monitoring to prevent scorching. Finally, air drying is a simple and natural technique, where flowers are hung upside down in a dark, dry place, a process that can take several weeks. Choosing the right technique depends on the types of flowers, the desired outcome, and the time available. Regardless of the method, the goal remains the same: to remove moisture and maintain the flower's form and color as effectively as possible.
Selecting the Right Flowers
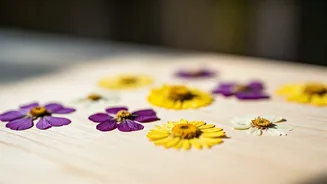
The success of pressed flower art often hinges on choosing the right blossoms. Selecting flowers that naturally have a flat profile or can be easily flattened is essential. Daisies, pansies, and violets are excellent choices because of their inherent structure. Furthermore, flowers with a single layer of petals tend to press better than those with multiple layers, as they dry more evenly. Consider the colors and shapes of flowers you choose. Opt for a variety of hues and forms to create a visually interesting composition. Collect flowers during their peak bloom for the best results and gather them on a dry day, avoiding freshly watered blooms, as excess moisture can hinder the drying process. Once picked, gently handle the flowers to avoid bruising. These careful selections will contribute significantly to the longevity and aesthetic appeal of your pressed flower art.
Arranging Your Design
Before pressing, the arrangement of your flowers is crucial. Planning your design on a separate piece of paper can help visualize the final outcome. Consider the overall composition: will it be symmetrical, asymmetrical, or a collage? Think about the negative space and how it contributes to the design's balance. Once you are ready, gently place the flowers on your pressing surface. Arrange the blooms face down, arranging stems and leaves to create visual interest. Use tweezers and fine tools for delicate work, as it allows for precise flower placement. Consider how the pressed flowers will look when displayed, considering the background and the frame. The goal is to create an aesthetically pleasing arrangement that draws the eye and tells a story, making each art piece unique and personal.
Creating Pressed Wall Art
Creating pressed flower wall art involves several key steps. After pressing, carefully remove the dried flowers from the press or paper. Use a pair of tweezers to handle them gently, as they are fragile. Next, prepare the backing for your art, which can be paper, cardstock, or fabric. Experiment with a variety of backgrounds and materials to enhance your artwork. Start arranging your pressed flowers onto the backing, experimenting with different layouts. Once you have a layout you love, you can then adhere the flowers using a clear-drying acid-free glue or adhesive. Allow the glue to dry completely before framing. Select a frame that complements your arrangement, considering the size and style. Use a frame with a glass front to protect and preserve your art. Then display your beautiful artwork, showcasing the delicate beauty of pressed flowers, creating a lasting memory of nature’s beauty.