
Ingredients Gathering
To begin your Neer Dosa adventure, you'll require a handful of basic ingredients. The foundation of this dish is rice, which needs to be soaked and then
ground into a fine paste. You'll also need water, which is the defining element of this recipe, lending its name and characteristic airy texture. A pinch of salt is crucial for seasoning and enhancing the flavors. A small amount of oil is needed for greasing the pan, to prevent the dosas from sticking. That's all you need, making it a simple and straightforward dish to prepare, perfect for a quick breakfast or a light meal anytime.
Rice Preparation First
Start by rinsing the rice thoroughly until the water runs clear. This step is important to remove any impurities. Now, soak the rice in enough water for at least 2-3 hours, or ideally, overnight. Soaking softens the rice, making it easier to grind and resulting in a smoother batter. After soaking, drain the water. Then, transfer the soaked rice to a grinder or blender. Add fresh water gradually, grinding the rice into a fine, smooth batter. The consistency is key: it should be thin and watery, much like milk. This is where the 'neer' (water) aspect truly shines.
Batter Seasoning Time
Once the rice batter is prepared, the next step involves seasoning it with salt. Start by adding salt to the batter, stirring well to ensure it is evenly distributed. Salt is a flavor enhancer, so adding it helps to bring out the natural flavors of the rice and gives the dosa a more well-rounded taste. You can also taste the batter to check if the salt is balanced, adjusting it to your preference. Remember, the batter should be thin and flowing. If it seems too thick, you can add a little more water until the correct consistency is achieved. Let the batter rest for at least 30 minutes, which allows the flavors to meld and the batter to settle slightly.
Pan & Dosa Cooking
Heat a non-stick pan or a well-seasoned cast iron skillet over medium-high heat. Lightly grease the pan with oil. Once the pan is hot, take a ladle of batter and pour it onto the center of the pan. The batter should spread quickly and thinly. Unlike other dosas, you do not need to spread the batter. Allow the dosa to cook for a minute or two. You'll notice bubbles forming on the surface, and the edges will start to lift. Do not flip the dosa; it's meant to be delicate and cooked only on one side. The edges will be slightly crisp, but the center will remain soft and almost translucent.
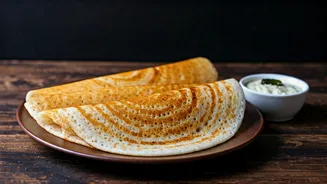
Dosa Serving and Enjoy
Once the Neer Dosa is cooked, carefully remove it from the pan. The dosa should be so thin that it appears almost transparent. Serve immediately while it's still warm and soft. Neer Dosa is best enjoyed with a variety of accompaniments. It pairs perfectly with coconut chutney, vegetable stew (sagu), or a simple curry. These dips and sides complement the mild flavor of the dosa, adding depth and zest to your meal. The delicate texture of the dosa, combined with the flavorful side dishes, makes for a truly delightful and satisfying breakfast.