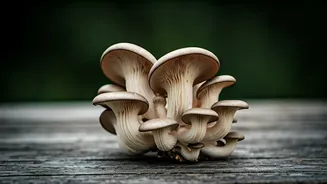


Substrate Selection Matters
The foundation for successful oyster mushroom cultivation lies in selecting the right substrate, which is essentially the food source for the mushrooms.
Several options are available, each with its own advantages. Straw, readily accessible and affordable, is a popular choice. It's crucial to chop it into smaller pieces to increase surface area and make it easier for the mushroom mycelium to colonize. Hardwood sawdust, another viable option, offers a more consistent nutrient base, promoting vigorous growth. However, this may require supplementation with materials like bran to increase nitrogen content. Other choices include coffee grounds, which provide readily available nutrients, though they can sometimes introduce contaminants if not properly handled. When choosing, consider availability, cost, and the specific needs of your oyster mushroom strain. Regardless of the chosen substrate, sterilization or pasteurization is essential to eliminate competing organisms, giving your oyster mushrooms a head start in their growth journey. This step significantly improves yield and reduces the risk of contamination, securing the success of your home mushroom farm.
Perfecting Environmental Conditions
Oyster mushrooms thrive in a specific set of environmental conditions. Mimicking these conditions as closely as possible is crucial for abundant yields. Temperature is a key factor; most oyster mushroom varieties prefer temperatures between 15-24°C (59-75°F) for fruiting. Humidity is just as important; maintaining a humidity level between 85-95% is generally ideal. This can be achieved through regular misting, using a humidifier, or placing the mushroom growing container in a humid environment such as a basement. Fresh air exchange is also vital. While oyster mushrooms need humidity, they also need access to fresh air to prevent the buildup of carbon dioxide, which can inhibit fruiting. Ensure the growing area has adequate ventilation, perhaps with strategically placed fans or by providing openings for air circulation. Finally, proper lighting is necessary. Oyster mushrooms don't need direct sunlight, but they do require some light to initiate fruiting. Indirect light or a few hours of fluorescent light each day will suffice. By carefully managing these environmental factors, you can create the perfect conditions for your oyster mushrooms to flourish and yield a bountiful harvest.
Monitoring Growth Regularly
Regular monitoring of your oyster mushroom growth is vital to catch any problems early and to ensure a successful harvest. Start by inspecting the substrate for signs of mycelial growth, which appears as a white, cottony substance spreading through the material. This indicates that the mushrooms are successfully colonizing the substrate. Watch for any unusual colors, odors, or signs of contamination, such as green molds or other unwanted organisms. If you observe any of these signs, isolate the affected area to prevent the spread and consider removing the contaminated substrate. Monitor the temperature and humidity levels regularly, adjusting as needed to stay within the ideal ranges. Observe the progress of the mushroom pins, the small, initial mushroom formations. These pins should develop into mature mushrooms within a few days to a week, depending on the conditions. Finally, document your observations regularly. Keeping a journal of the environmental conditions, growth progress, and any problems encountered can help you identify patterns and refine your growing techniques over time. Regular monitoring enables you to take timely action, maximize yield, and maintain a healthy, productive mushroom farm.
Harvesting at the Right Time
Knowing when to harvest your oyster mushrooms is critical to maximizing both flavor and yield. The ideal time to harvest is when the mushroom caps are fully developed but before the edges begin to curl upwards. Oyster mushrooms typically mature rapidly, so daily checks are often necessary. Look for fully formed caps, often with a slightly curved edge. If the edges begin to curl upwards, this is a sign that the mushrooms are beginning to release spores, and their texture may start to become tough. The size of the mushrooms can also be an indicator; a typical oyster mushroom may be ready for harvest when the caps are around 5 to 10 centimeters across. Once harvested, cut the mushrooms at their base, close to the substrate, using a clean knife. Avoid pulling the mushrooms as this may damage the remaining mycelium and potentially hamper future flushes. After harvesting, clean the mushrooms gently by brushing off any substrate particles or debris. These freshly harvested oyster mushrooms are now ready to be enjoyed, whether sautéed, added to your favorite dishes, or stored for later use. Harvesting at the right time ensures you enjoy the best flavor and texture of your homegrown oyster mushrooms.