


The Rise of the DIY Dog Treat
In a world of complex ingredient labels and occasional pet food recalls, the appeal of homemade treats is undeniable. Store-bought options can be fantastic, but making your own offers a unique set of benefits. First, you have absolute control. You know
exactly what’s going into the recipe—and more importantly, what isn't. This is a game-changer for pets with specific allergies, digestive sensitivities, or dietary restrictions. Second, it's often more economical. Organic, single-ingredient commercial treats can be pricey, but their raw components are typically affordable. Finally, there's the bonding aspect. The process of baking for your pet, and the excited tail wags that follow, can be a rewarding experience for both of you. It transforms treat time from a simple transaction into a shared, loving activity.
Safety First: A Vet's Perspective
The term “vet-approved” is key. While the following recipes use ingredients widely considered safe and healthy by veterinary professionals, it's crucial to remember that every pet is an individual. Before you preheat the oven, have a quick chat with your veterinarian. They can offer guidance based on your pet’s specific health profile, age, and breed, especially if they have conditions like diabetes, pancreatitis, or kidney disease. Always introduce new foods slowly and in small quantities to monitor for any adverse reactions. And remember the golden rule of treats: they should make up no more than 10% of your pet's daily caloric intake. Finally, be aware of common kitchen ingredients that are toxic to dogs, such as xylitol (a sugar substitute), onions, garlic, grapes, raisins, and chocolate.
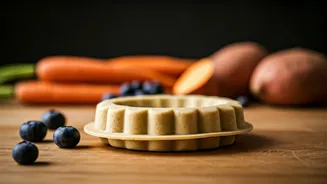
Recipe 1: Pumpkin & Peanut Butter Power Bites
This classic combination is a favorite for a reason. Pumpkin is excellent for digestive health, and peanut butter is an irresistible, protein-packed reward. These soft-baked treats are perfect for dogs of all ages.Ingredients: - 1 cup pumpkin puree (plain, 100% pumpkin, not pie filling) - 1/2 cup creamy peanut butter (ensure it's xylitol-free) - 2 large eggs - 2 1/2 cups whole wheat flour (or oat flour for a gluten-free option)Instructions: 1. Preheat your oven to 350°F (175°C) and line a baking sheet with parchment paper. 2. In a large bowl, mix the pumpkin puree, peanut butter, and eggs until well combined. 3. Gradually add the flour, mixing until a stiff dough forms. 4. Roll the dough out on a lightly floured surface to about 1/4-inch thickness. Use cookie cutters to create fun shapes or simply cut into small squares. 5. Place the treats on the prepared baking sheet and bake for 20-25 minutes, or until the edges are golden brown. 6. Let them cool completely before serving. Store in an airtight container in the refrigerator for up to a week.
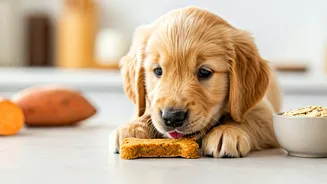
Recipe 2: Simple Sweet Potato Chews
It doesn't get easier or healthier than this single-ingredient recipe. Sweet potatoes are rich in vitamins and dietary fiber, and when slowly baked, they develop a chewy texture that dogs love. These are a fantastic alternative to commercial rawhide chews.Ingredients: - 2 large sweet potatoesInstructions: 1. Preheat your oven to its lowest setting, typically around 200-250°F (95-120°C). 2. Wash and dry the sweet potatoes thoroughly. You can peel them or leave the skin on for extra fiber. 3. Slice the sweet potatoes lengthwise into 1/3-inch thick strips. The consistency of your slices will determine the final chewiness. 4. Arrange the slices in a single layer on a baking sheet lined with parchment paper. 5. Bake for 3-4 hours, flipping halfway through. The exact time will depend on the thickness of your slices and your oven. You're looking for them to be dehydrated and chewy, not burnt or crispy. 6. Cool completely. These will become harder as they cool. Store in an airtight container at room temperature for up to two weeks.
Recipe 3: Frozen Berry & Yogurt Pupsicles
Perfect for a hot day or as a soothing treat for a teething puppy, these frozen delights are both refreshing and packed with goodness. Yogurt provides probiotics, while berries offer a boost of antioxidants.Ingredients: - 1 cup plain, unsweetened yogurt (Greek yogurt works well) - 1/2 cup mixed berries (blueberries, raspberries, or chopped strawberries) - 1 tablespoon water, if neededInstructions: 1. In a blender, combine the yogurt and berries. Blend until smooth. If the mixture is too thick, add a tablespoon of water to reach a pourable consistency. 2. Carefully pour the mixture into an ice cube tray or small silicone molds. 3. For a fun touch, you can insert a dog-safe 'stick' like a small carrot stick or a piece of a dental chew into each mold before freezing. 4. Freeze for at least 4 hours, or until solid. 5. Pop one out of the mold and let your pup enjoy a cool, tasty treat. Store the remaining pupsicles in a freezer bag.