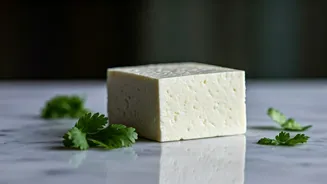


The Crumbly Paneer Catastrophe
Paneer is a fresh, non-melting cheese that should be firm enough to be pan-fried, grilled, or simmered in a sauce without falling apart. When it crumbles, it’s a sign that something went wrong in its creation, specifically in how the milk proteins (casein)
bonded and how much moisture (whey) was expelled. A crumbly texture can ruin dishes like palak paneer, matar paneer, or paneer tikka, where the cheese is the star. The good news is that whether you're buying it from a store or making it at home, you have more control than you think.
For Store-Bought Paneer: The 15-Minute Fix
If you're working with store-bought paneer, you’ve probably noticed that quality varies wildly. Some brands are beautifully firm, while others are chalky and prone to breaking. The quickest way to improve the texture of almost any block is a simple soak. Cut your paneer into cubes and place them in a bowl of warm (not boiling) salted water for about 15 to 20 minutes before using. This does two things: it rehydrates the cheese, making it softer and more tender, and it helps it hold together better during cooking. After soaking, gently pat the cubes dry before frying to ensure you get a good, golden sear.
Homemade Paneer? Milk Is Everything
If you’re making paneer from scratch, the single most important decision you’ll make is your choice of milk. For a firm, rich, and cohesive paneer, you must use full-fat, whole milk. Skim, 1%, or 2% milk lacks the necessary fat content to create strong, flexible curds. Fat acts as a tenderizer and a binder within the protein structure. Without it, the curds become tough, dry, and brittle, leading directly to that dreaded crumbly texture. Don’t even think about using UHT (Ultra-High Temperature) pasteurized milk; its proteins have been denatured in a way that prevents them from forming a proper curd.
The Acid Test: How You Curdle Matters
The next critical step is coagulation—adding an acid to the hot milk to separate the curds from the whey. The key here is control. First, bring your milk to a gentle simmer, not a rolling boil. A violent boil can agitate the proteins too much. Second, once it’s simmering, reduce the heat to low and add your acid (like lemon juice or white vinegar) gradually, stirring gently. Don't dump it all in at once. This slow addition allows for larger, softer curds to form. Stop adding acid as soon as you see a clear separation, with greenish or yellowish whey. Adding too much acid will make the final product rubbery or grainy.
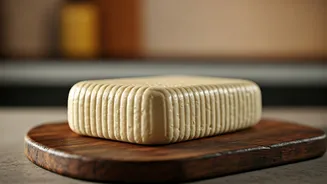
The Big Squeeze: Pressing for Perfection
This is where crumbly paneer is either made or avoided. After you've strained the curds through a cheesecloth, you need to press them to expel the remaining whey and fuse the curds into a solid block. Gather the cheesecloth into a bundle, give it a gentle squeeze to remove excess liquid, and then place it on a plate. Fold the cloth over to form a neat package, place another plate on top, and add weight. For a 2-quart batch of milk, you need a substantial amount of weight—at least 10 to 15 pounds. A cast-iron skillet, a few large cans of tomatoes, or a Dutch oven work well. Press the paneer for a minimum of one hour, but for an extra-firm block perfect for grilling, press it for up to three hours. Insufficient pressing is the number one cause of crumbly homemade paneer.
Finishing Touches for a Flawless Block
Once your paneer has been thoroughly pressed, the final step is to let it set. You can use it right away, but for the cleanest cuts and firmest texture, chilling is recommended. Submerge the pressed block (still in its cheesecloth or unwrapped) in a bowl of cold water and refrigerate it for at least 30 minutes. This shock of cold water helps firm up the cheese, giving it a dense, smooth consistency. After chilling, your paneer will be robust, sliceable, and ready to become the hero of your next meal.