

Vegetable Prep Essentials
Embarking on the culinary journey of creating authentic Pav Bhaji necessitates a meticulous approach to vegetable preparation. The foundation of this beloved
dish lies in a harmonious blend of mixed vegetables, each contributing its unique texture and flavor profile. Typically, a robust combination includes potatoes, cauliflower, peas, carrots, and bell peppers, though variations are always welcome. Before these vibrant ingredients can be transformed into a delicious mash, they must be thoroughly washed to remove any impurities. Following the washing, a precise chopping process is crucial. Larger vegetables like potatoes and cauliflower should be cut into roughly equal-sized, manageable chunks, ensuring they cook uniformly in the pressure cooker. Smaller vegetables like carrots and peas can be left whole or diced depending on preference and size. Bell peppers are usually deseeded and then chopped into medium pieces. This careful preparation ensures that all vegetables reach the desired tenderness simultaneously, creating a cohesive and flavorful bhaji base.
Pressure Cooker Magic
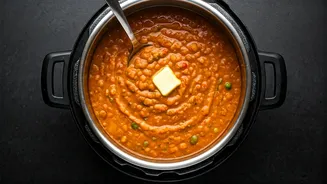
The true innovation in this recipe lies in leveraging the power of the pressure cooker to expedite the cooking process, traditionally a time-consuming affair. Once your vegetables are prepped and ready, they are transferred into the pressure cooker pot. A crucial step here is the addition of water, just enough to facilitate steaming and prevent sticking, typically around half a cup. Salt is added at this stage to season the vegetables as they cook. For an authentic Mumbai flavor, a generous tablespoon of pav bhaji masala is stirred in, infusing the vegetables with its characteristic spicy and tangy notes. Some recipes also call for a bit of turmeric powder for color and a hint of red chili powder for added heat. Once all ingredients are in the pot, the lid is securely fastened, and the cooker is placed on the stove over medium-high heat. The magic begins as the pressure builds. Once the first whistle blows, indicating that the cooker has reached optimal pressure, the heat is reduced to a low simmer. The vegetables are then cooked for approximately 3 to 4 whistles, or about 8-10 minutes, depending on the pressure cooker's efficiency. This controlled cooking under pressure ensures that the vegetables become incredibly tender and meld together beautifully, forming the perfect base for the bhaji.
Bhaji Tempering Technique
After the pressure has been released from the cooker, the partially cooked vegetables are ready for the next phase: mashing and tempering. Carefully open the lid and, using a potato masher or the back of a ladle, thoroughly mash the softened vegetables directly in the pressure cooker. The goal is a thick, consistent mash, free of large chunks. Now comes the flavorful tempering. Heat a tablespoon or two of oil or butter in a separate pan (or if your pressure cooker has a sauté function, you can use that). Finely chopped onions are sautéed until translucent and fragrant. Next, add finely minced ginger and garlic, sautéing for another minute until their raw aroma dissipates. Green chilies, finely chopped, are added for a spicy kick. Once the aromatics are fragrant, add finely chopped tomatoes, cooking them down until they soften and release their juices. At this point, more pav bhaji masala, red chili powder, and a pinch of garam masala are added to deepen the flavor profile. A small amount of water can be added to create a smooth gravy consistency. This fragrant masala mixture is then poured directly into the mashed vegetables in the pressure cooker. Stir everything together thoroughly, ensuring the masala evenly coats the mashed vegetables. The bhaji is then simmered for a few more minutes, allowing the flavors to meld beautifully. A final touch of chopped fresh coriander leaves and a squeeze of lemon juice elevate the taste and aroma, creating that irresistible street-food essence.
Perfect Pav Preparation
No Pav Bhaji is complete without perfectly prepared pav, the soft, slightly sweet buns that are the quintessential accompaniment. While the bhaji simmers and its flavors intensify, attention turns to the pav. The traditional method involves slicing the pav buns horizontally, but not all the way through, so they remain connected on one side. To enhance their taste and texture, they are then lightly buttered. For an extra layer of flavor, a small amount of the prepared bhaji mixture, along with a sprinkle of chopped coriander and a dash of pav bhaji masala, can be spread on the inner surfaces of the pav before toasting. This step is optional but highly recommended for an elevated taste experience. The buttered pav are then toasted on a hot tawa (griddle) or frying pan until they are golden brown and slightly crisp on the outside, while remaining soft and fluffy within. The key is to achieve a gentle toasting that imparts a beautiful aroma and a delightful contrast to the soft bhaji. Some prefer to toast the pav directly in the bhaji mixture in the final stages of cooking for a more integrated flavor, while others keep the toasting process separate for a cleaner presentation. Either method results in delicious pav ready to soak up the rich flavors of the bhaji.