


Eye Prep Essentials
Begin by creating a flawless canvas for your eyeshadow. Apply a thin layer of eye primer or concealer across your eyelids to smooth out any discoloration
and prevent creasing throughout the day. This crucial first step ensures your makeup stays put and looks impeccable. Once applied, gently blend the product using your fingertip or a small brush for an even finish. To further enhance blendability and achieve a polished look, lightly dust a neutral setting powder over the prepared lids.
Building the Base
Next, establish the foundational tone for your smokey effect. Select a soft neutral shade, such as a light brown or taupe, that is subtly darker than your natural skin tone. Using a fluffy blending brush, carefully pick up a small amount of this transition shade, tapping off any excess to avoid product buildup. Sweep the brush back and forth across your eyelid crease, the natural fold where your eyelid bends. This action warms up the eye area and provides a smooth gradient for the deeper colors to come, setting the stage for that signature smokey depth.
Adding Deeper Tones
Introduce dimension and intensity by incorporating a darker hue. Opt for shades like deep brown, charcoal grey, or even a muted black, depending on your desired level of boldness. Employ a smaller, denser brush to precisely deposit this darker shadow onto the outer corner of your eyelid, focusing the pigment where you want the smokiness to originate. After application, switch to a clean blending brush and softly diffuse the color inward towards the center of your lid. The goal is to soften the edges and seamlessly merge this darker shade with your base, ensuring a smooth transition rather than harsh lines. It’s always easier to build up intensity gradually than to correct an overly dark application.
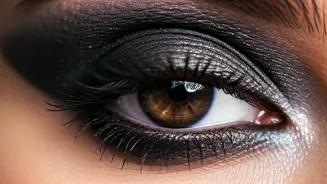
Creating the Smoke
To achieve the quintessential smokey effect, apply a very dark shade, such as black, deep brown, or dark plum, directly along your upper lash line. Think of this step as applying a smudgy eyeliner using eyeshadow. A small smudge brush, angled brush, or even your fingertip can be used to place the color. Gently blend this dark pigment outward and slightly upward, softening the line. This technique imparts a sultry, effortless allure and enhances the depth of your eyeshadow, creating that captivating smokey gaze.
Highlighting for Brilliance
Brighten and define your eyes by adding a touch of shimmer. Choose a pearly or light gold shade that complements your skin tone. Using a small brush or your fingertip, carefully dab this highlight onto the inner corners of your eyes. This strategically placed shimmer instantly opens up the eyes, making you appear more awake and creating a beautiful contrast with the deeper shadows. Additionally, apply a subtle sweep of highlight just under your brow bone. This lifts the brow area, balances the intensity of the lid colors, and contributes to a professionally finished, radiant look.
Liner and Mascara Finale
No smokey eye is complete without the finishing touches of eyeliner and mascara. Glide a creamy pencil liner in black or brown along both your upper and lower lash lines. Immediately after application, use a small smudge brush, cotton swab, or your fingertip to softly blur the edges of the liner, creating a diffused effect instead of a sharp line. For added volume, consider tightlining your upper waterline. Finally, coat your lashes from root to tip with mascara, building volume and lift. For smaller eyes, keep the lower lash line smudging very soft to avoid closing them off; larger or almond-shaped eyes can handle bolder smudging for enhanced drama.