
Gathering Ingredients
The first phase in preparing Milk Mawa Barfi involves collecting the ingredients that will come together to form this delightful treat. You'll need key
ingredients like milk, mawa (also known as khoya), sugar, and optionally, cardamom powder. Ensure the mawa is of good quality, as it significantly impacts the final taste and texture of the barfi. Having all ingredients measured out and readily available streamlines the cooking process, making it easier to manage and less hectic. Consider using fresh milk for a richer taste and the purest results, adding to the authenticity of the barfi. Prepare any garnishes, like chopped nuts or silver leaf, which enhance both the look and flavor of the final dish. A well-organized workspace contributes greatly to a stress-free and enjoyable cooking experience.
Preparing the Mixture
The preparation of the mixture is a critical stage in the making of Milk Mawa Barfi, directly affecting its final consistency and taste. Initially, combine the milk and mawa in a heavy-bottomed pan. Using a heavy pan prevents the mixture from sticking and burning, crucial for uniform cooking. Over medium heat, stir continuously to avoid lumps and ensure the mawa dissolves fully into the milk. This constant stirring is necessary to maintain a smooth consistency. As the mixture heats, it will begin to thicken. This is the stage where the sugar is incorporated, typically followed by the cardamom powder, providing its distinct aroma and flavor. Continue stirring until the mixture reduces significantly and begins to pull away from the sides of the pan. This indicates that it's nearing the ideal consistency.
Achieving the Right Texture
Achieving the right texture for Milk Mawa Barfi is essential for its perfect mouthfeel. The mixture reaches the ideal stage when it thickens substantially and leaves the sides of the pan cleanly. At this point, you can perform a consistency test. Drop a small amount of the mixture into cold water; if it forms a soft ball, it's ready. If it's too soft, continue cooking for a little longer, checking frequently. Overcooking can make the barfi too hard, while undercooking can lead to a soft, crumbly texture. Achieving this balance requires careful monitoring and a bit of practice. The right texture gives the barfi its characteristic firmness and melt-in-your-mouth quality. The correct texture ensures that the barfi slices cleanly and holds its shape.
Setting and Cooling
After achieving the correct consistency, the next step involves setting and cooling the Milk Mawa Barfi. Grease a tray or plate with ghee or oil to prevent the barfi from sticking. Immediately pour the hot mixture into the greased tray, spreading it evenly. This even distribution helps in uniform cooling and solidification of the barfi. Sprinkle your chosen garnishes like chopped nuts or silver leaf over the surface while it's still warm to make them adhere properly. Allow the barfi to cool completely at room temperature; this process allows the mixture to set. The cooling phase is critical for the barfi to firm up and achieve its characteristic shape and texture. Once cooled, the barfi can be cut into desired shapes.
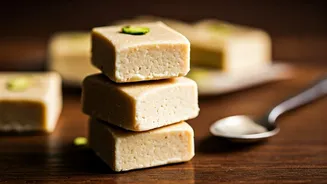
Cutting and Serving
The final stage involves cutting the cooled Milk Mawa Barfi into your preferred shapes and serving it. Use a sharp knife to cut the barfi into squares, diamonds, or any other shapes you like. The knife should glide through the barfi easily if the texture is perfect. If it's too sticky, it might need to cool a little more; if it's too hard, the mixture was likely overcooked. After cutting, carefully lift the pieces to prevent breakage. Arrange the cut barfi on a serving platter, ready to be enjoyed. The presentation adds to the experience, making the treat even more appealing. Milk Mawa Barfi is best served at room temperature, making it perfect for any occasion, from festive celebrations to simple gatherings. Enjoy this classic Indian sweet!