


Karanji: The Basics
Karanji is a treasured Maharashtrian sweet, commonly enjoyed during Diwali. This festive treat is known for its half-moon shape, consisting of a crispy
outer shell and a sweet filling called "saran." In Northern India, a similar confection called "Gujiya" is popular, featuring a filling of mawa (milk solids) and dried fruits. The outer shell of karanji typically includes all-purpose flour, semolina, ghee, and milk. These ingredients are combined, rolled thin, and filled with the sweet mixture. Then, the circle is folded in half and crimped to seal the filling inside. For the most delightful texture, the outer shell can be layered with a creamy paste made from ghee and rice flour, known as "Sata" in Marathi, between each dough sheet to achieve a flaky, textured pastry. Traditionally, the filling includes roasted dry coconut, poppy seeds, sugar, cardamom, and nuts. Fresh coconut versions, called "Olya Naralachi Karanji," are also made for festivals like Ganesh Chaturthi and Raksha Bandhan. These fresh coconut versions have a shorter shelf life due to the coconut's moisture content.
Mom's Unique Filling
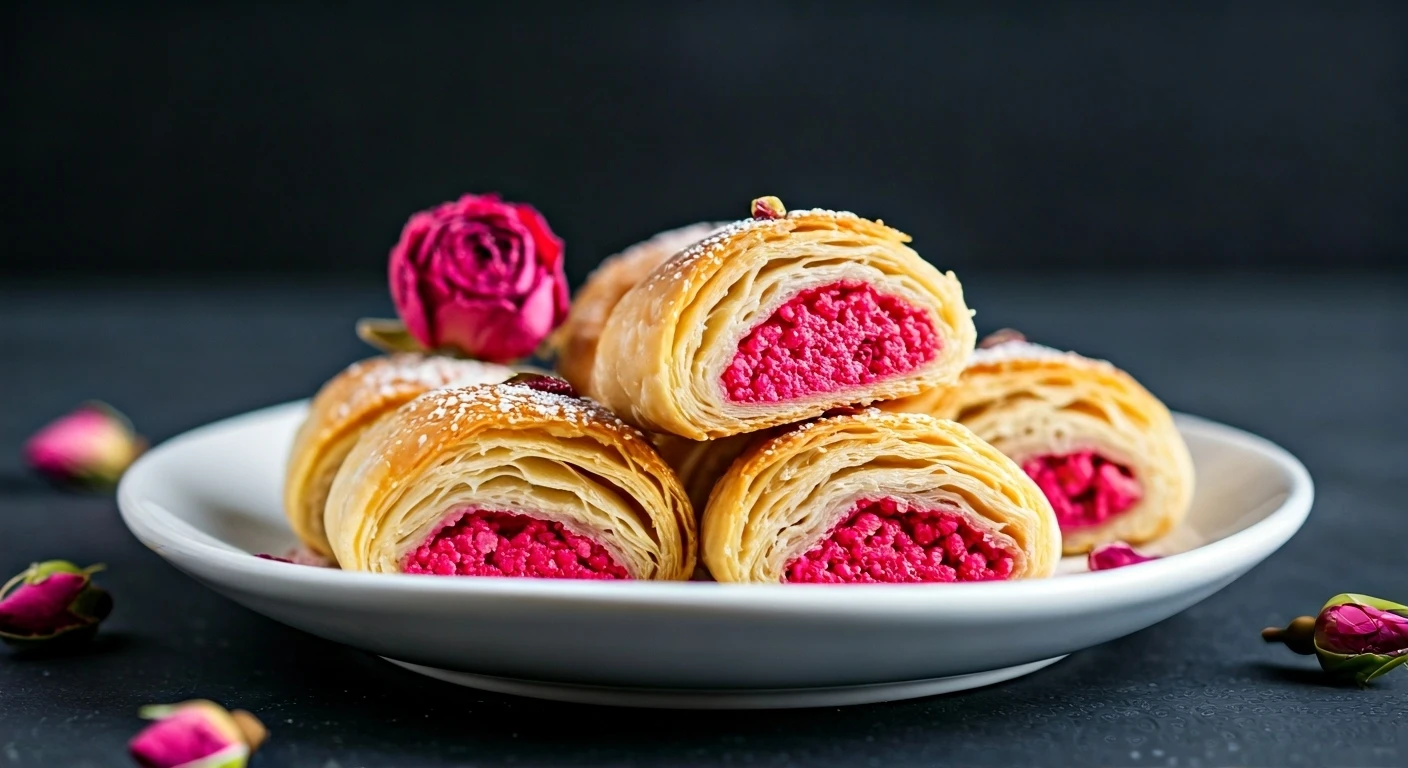
This Rose Coconut Karanji recipe is based on a special, no-cook filling developed by the author's mother. The author has a strong preference for her mother's recipe above all others. Her no-cook filling is a convenient option and ready in just 5 minutes without sacrificing flavor. The creator of the recipe takes time to color the dough with natural ingredients. This includes layering three different doughs before rolling them out. Although this is time-consuming, it ensures the final product has a light, flaky texture and a striking swirled pattern. If you're pressed for time, you can skip the layering process and simply roll out the white dough balls. This recipe also includes the use of basic Indian ingredients, like all-purpose flour, semolina, ghee, and milk for the outer shell. For the filling, you'll need desiccated coconut, powdered sugar, rose petal preserves, and rose essence. To make the layering, ghee and fine rice flour are needed.
Dough Preparation Steps
To begin, combine semolina and all-purpose flour in a bowl. Heat ghee, and then add it to the flour mixture. Thoroughly massage the ghee into the flour for about 3 to 4 minutes, or until the mixture forms a loose ball. Next, incorporate warm milk into the flour mixture, kneading until a firm dough is achieved. Remember that the amount of milk needed might vary depending on the type of semolina used. Allow the dough to rest for around 20 minutes. To make the filling, combine all the filling ingredients in a mixing bowl. Use your hands to gently rub the filling for a couple of minutes, ensuring the rose preserve is mixed well. For the layering paste, mix rice flour and ghee. Set this aside. If you want to color the dough, divide the dough into three equal portions. Since one-third of the dough will remain white, knead this ball of dough first to prevent color transfer. Knead for about 2-3 minutes. Add bloomed saffron to the second portion and knead for 5 minutes until the color is evenly distributed. In the final piece, add a teaspoon of beet juice (or a few drops of red food coloring) and knead well for 5 minutes or until the color is evenly distributed.
Layering the Dough
After preparing the colored doughs, roll each dough ball into a thin, 12-inch circle. Evenly spread one-third of the rice flour paste over the white circle. Place the red circle over the white one, and apply another thin layer of the rice flour paste. Finally, place the yellow dough on top and spread a final thin layer of the rice flour paste. Tightly roll up the layered dough and cut it in half. Then, cut each half into 1-inch discs to achieve a total of 24. Take one disc and gently press the outer white edge forward. Make sure that the outermost layer sits on the top, with the layers overlapping. This step is very important because it helps the layers stay together while rolling out the dough. Avoid flattening the disc's center to prevent the layers from separating during rolling. Next, roll each flattened disc into a 3-inch circle. Put about a tablespoon of filling in the center of each circle. Apply a little milk to the edges with your finger and fold the circle in half to form a semi-circle. Ensure the edges are sealed to keep the filling inside.
Shaping, Frying Karanji
Once the karanji is sealed, use a spiral pastry cutter to trim the excess dough and shape the pastries. This step is entirely optional. You can also fry the sealed karanji as they are. Alternatively, use a fork to create a pattern along the edges, or fold the edges into tiny pleats. Repeat the rolling, filling, sealing, and shaping process until all the dough is used. Keep the shaped karanji covered with a moist paper towel. Once all the karanjis are ready, heat oil in a frying pan over medium-high heat. When the oil is hot, carefully add 4 to 5 karanjis (or less, depending on the size of your pan). Reduce the heat to medium-low and fry for about 4-5 minutes, turning them halfway through. If they start to brown too quickly, lower the heat further. To store the fried karanji, let them cool completely before placing them in an airtight container. They can be stored this way for up to two weeks.