
Quick Pre-Clean Prep
Before starting any cleaning, gather all your supplies in one location. This prevents unnecessary trips around the kitchen, making the process smoother.
Assemble cleaning agents like dish soap, all-purpose cleaner, and a specific glass cleaner. Additionally, have essential tools ready: a sponge, dishcloths, paper towels, and a microfiber cloth. Wearing gloves will protect your hands. Dispose of any visible food scraps immediately. Clear your sink of dirty dishes by either washing them directly or placing them in the dishwasher. Clear the countertops of any clutter such as stray utensils or appliances that are not being used, and place them back in their designated spots. This initial organization step sets the stage for an efficient cleaning routine, saving time and effort throughout the process.
Dish Duty Domination
The next step involves tackling the dishes, which often accumulate throughout the day. If you have a dishwasher, load it efficiently, scraping off any food residue beforehand. Run the dishwasher on a cycle best suited for your dishes' level of dirtiness. If hand-washing is your preferred method, start with the least greasy items first, like glasses, before moving on to plates, cutlery, and pots. Use hot, soapy water to dissolve grease and grime effectively. Rinse thoroughly under running water to remove all soap residue. As each item is washed, place it immediately in a drying rack or dry it with a clean dishcloth. This not only clears your sink but also creates a workspace to prepare food and cook later.
Surface Wipe Down
Next, focus on wiping down all kitchen surfaces. This includes countertops, stovetops, backsplashes, and the exterior of appliances. Use an all-purpose cleaner for countertops to remove spills and crumbs. Spray the stovetop with a degreasing cleaner, and wipe it down with a clean cloth. For backsplashes, use the same all-purpose cleaner as the countertops to remove any splashes. Stainless steel appliances, like refrigerators and microwaves, should be cleaned with a suitable cleaner to remove fingerprints and smudges. This step ensures that all food preparation and high-touch areas are sanitized. Regularly cleaning surfaces keeps your kitchen hygienic and visually appealing.
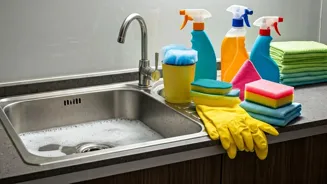
Sink Sanitation Solutions
The sink can be a breeding ground for germs. Start by rinsing the sink to remove any food debris. Then, sprinkle baking soda generously in the sink and on the surrounding surfaces. Pour a small amount of white vinegar over the baking soda, which will create a fizzing action. Allow the mixture to sit for a few minutes, and use a sponge or brush to scrub the sink's interior, paying special attention to the drain. This natural cleaning method helps dissolve grease and disinfects the sink, eliminating odors. Rinse thoroughly to remove any residue, leaving your sink sparkling and sanitized. This simple step ensures a clean and fresh-smelling kitchen.
Final Floor Finish
Concluding the process, clean the kitchen floor. This involves sweeping or vacuuming to remove loose dirt and debris. After the initial sweep, mop the floor with a suitable floor cleaner appropriate for your flooring type. Start at one corner of the kitchen and work your way toward the exit to avoid walking on the wet floor. For hard floors, use a slightly damp mop to prevent excessive water from damaging the surface. Allow the floor to dry completely before using the kitchen to prevent slips and to ensure the floor is spotless. This final step ensures that your kitchen is completely clean and ready to be used for food preparation.