
About Aloo Paratha
Aloo Paratha, a staple in Indian cuisine, is a delicious flatbread that brings together the simplicity of a paratha with the savory goodness of a spiced
potato filling. Its origins trace back to the Indian subcontinent, where it has evolved over generations. Today, it’s enjoyed across India and by food enthusiasts worldwide. The appeal lies in its versatility and adaptability – perfect for breakfast, lunch, or dinner. It also holds cultural significance, often prepared during festive occasions and family gatherings. The blend of textures and tastes, from the soft potato filling to the crispy, golden-brown exterior, makes Aloo Paratha a highly coveted dish. It’s typically served with yogurt, pickles, and butter, creating a satisfying and wholesome meal that highlights Indian culinary traditions.
Gather Your Ingredients
To make a delicious Aloo Paratha, you'll need a handful of essential ingredients. For the dough, start with all-purpose flour (maida) or whole wheat flour (atta), water, salt, and a touch of oil. For the filling, gather potatoes, onions, green chilies (adjust to your spice preference), ginger-garlic paste, coriander leaves, and a blend of spices such as turmeric powder, red chili powder, cumin powder, and garam masala. You may also want some oil or ghee for cooking the parathas. It’s important to choose fresh, good-quality ingredients to get the best taste. The flour type can influence the texture; atta provides a heartier paratha, while maida might make it a bit softer. When selecting potatoes, opt for ones that hold their shape when boiled. For the spices, always check the expiry date and the aroma to ensure freshness.
Prepare the Dough
Start by preparing the dough. In a large bowl, mix the flour with salt. Add a little oil and mix. Gradually add water and knead the dough until it forms a smooth and pliable consistency. The consistency is critical – it shouldn't be too stiff or too soft. Cover the dough with a damp cloth and let it rest for at least 30 minutes. This resting period allows the gluten to relax, making the parathas easier to roll and ensuring a softer texture. Meanwhile, you can start preparing the potato filling. The dough should be soft but not sticky. Kneading is a crucial step; this process develops the gluten in the flour, providing the elasticity required to roll out the parathas without tearing. If the dough feels too dry, add a few more drops of water. If it’s too sticky, add a little more flour and knead again until the desired consistency is achieved.
Craft the Filling
The preparation of the potato filling is vital for flavor. Boil the potatoes until they’re soft, peel, and then mash them thoroughly, ensuring there are no lumps. In a pan, sauté finely chopped onions, green chilies, and ginger-garlic paste until the onions turn translucent. Add the mashed potatoes, turmeric powder, red chili powder, cumin powder, garam masala, and salt. Mix everything well, incorporating the spices evenly. Finally, stir in the chopped coriander leaves. Taste the filling and adjust the seasonings as per your preference. The filling should be flavorful but not overwhelmingly spicy; the balance is key. After the filling has been prepared, let it cool completely before using it. This is because a warm filling can make the parathas difficult to roll and may cause them to break during the cooking process.
Assemble the Paratha
Once both the dough and filling are ready, it's time to assemble the parathas. Take a small portion of the dough and roll it into a small circle. Place a spoonful of the potato filling in the center of the circle. Gather the edges of the dough and seal them, forming a ball. Lightly flatten the ball and then gently roll it out into a circle, about 6-8 inches in diameter, using a rolling pin. Be careful not to press too hard, as this may cause the filling to come out. If the paratha is sticking, dust the rolling surface and rolling pin with some dry flour. The skill comes with practice, so don't be discouraged if the first few are not perfect. The goal is to get a paratha that's evenly filled and rolled to a consistent thickness, with the filling well-contained within the dough.
Cook to Perfection
Heat a tawa (griddle) or a flat pan over medium heat. Place the rolled-out Aloo Paratha on the hot tawa. Let it cook for about a minute. When you see bubbles appearing on the surface, flip the paratha. Drizzle a little oil or ghee around the edges. Press gently with a spatula and cook until golden brown spots appear on both sides. Flip the paratha again and cook the other side, drizzling some more oil or ghee. Ensure both sides are cooked well and evenly browned; this indicates that the paratha is ready. The cooking time varies depending on the heat of your stove, but it usually takes 2–3 minutes per side. Remove the cooked paratha and serve immediately. It's best served hot, with a dollop of butter or ghee, and a side of yogurt and pickle.
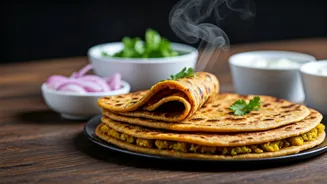
Serving Suggestions
Aloo Paratha can be enjoyed in various ways. It's commonly paired with plain yogurt, which cools down the spices, and a side of pickle (achar) to provide a tangy counterpoint. A dollop of butter or ghee on top adds richness. It's also delicious with raita, a yogurt-based side dish with vegetables and spices. For a heartier meal, serve Aloo Paratha with a curry like chhole (chickpea curry) or a vegetable dish. In terms of drinks, a refreshing glass of lassi or a cup of hot tea complements the paratha perfectly. Aloo Paratha can be eaten for breakfast, lunch, or dinner, offering a filling and nutritious meal that pleases all. The serving style can be tailored to individual tastes.
Tips and Tricks
To achieve Aloo Paratha success, here are a few handy tips. Ensure the dough is well-kneaded and rested. The resting time ensures that the gluten develops and makes the dough more pliable. Always use good quality potatoes and spices to enrich the flavor of your paratha. Avoid overfilling the parathas. Overfilling makes them harder to seal and roll and can lead to the filling bursting during cooking. Cook the parathas over medium heat. High heat can burn them, while low heat makes them dry. Always keep the tawa hot for even cooking. Experiment with fillings. You can add other vegetables, like grated carrots or cauliflower. Practice makes perfect, so don’t get discouraged if the first attempts aren't perfect; each try brings you closer to mastering this beloved dish.