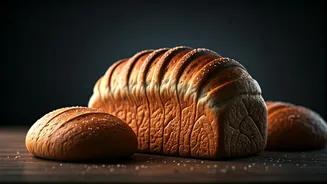


What is Shio Pan?
Shio Pan, or salt bread, has taken the culinary world by storm, originating in Japan and exploding in popularity across South Korea before captivating
the US. At first glance, these golden rolls resemble simple crescent shapes, but their appeal lies in a delightful textural and flavor contrast. When you bite into a Shio Pan, you're met with an impossibly fluffy interior, enriched by a core of butter that melts as it bakes. This internal butter doesn't just infuse the dough with richness; it also fries the underside of the roll during baking, creating a signature crisp, golden base. A final dusting of salt on top perfectly balances the sweetness and richness, resulting in a complex bite that is simultaneously soft, buttery, and delightfully crunchy. Many bakers have become captivated by this unique bread, with some even dedicating their online content to its creation and perfection.
Essential Ingredients
Crafting authentic Shio Pan requires precision, so exact measurements in grams are crucial. You'll need 400 grams of bread flour and 120 grams of cake flour to form the perfect dough structure and tenderness. To enhance the flavor and texture, incorporate 30 grams of non-fat milk powder, 26 grams of sugar for a subtle sweetness, and 10 grams of salt. The liquid component is key: use 365 grams of ice-cold water to ensure proper gluten development without premature yeast activation. For the rich, buttery core and crisp base, prepare 40 grams of cold, unsalted butter, diced into small pieces to be incorporated into the dough, and an additional 12 portions of 15-gram butter chunks for filling. Lastly, 7 grams of instant dry yeast will leaven the dough, and flaky salt is essential for that characteristic topping.
Kneading and First Rise
Begin the Shio Pan-making process by combining both types of flour, sugar, salt, and milk powder in the bowl of a stand mixer fitted with a dough hook. Pour in the ice-cold water, ensuring it's thoroughly chilled, perhaps by refrigerating it overnight or chilling it with ice cubes for a few minutes. Mix on a low speed until the ingredients form a shaggy, somewhat unkempt dough. Next, it's time to incorporate the cold, unsalted butter. Add the butter chunks to the dough and increase the mixer speed to medium. Knead for a significant period, typically 15 to 25 minutes, but be prepared for it to take up to 30 minutes, depending on your mixer. The dough will be quite sticky; resist the temptation to add extra flour, as this can negatively impact the final texture. Periodically perform a windowpane test by stretching a small piece of dough until it's translucent enough for light to pass through. Continue kneading until the dough pulls away cleanly from the bowl and stretches thinly without tearing immediately. Once the dough reaches this stage, shape it into a tight, smooth ball, return it to the bowl, cover it, and allow it to rise in a warm spot until it has doubled in size, which usually takes about an hour in a room temperature around 78°F.
Shaping the Rolls
While the dough undergoes its initial rise, prepare the butter for the filling by cutting 12 portions of 15 grams each into small pieces. Once the dough has doubled, perform the poke test: gently press a finger into the center; if the indentation remains without springing back, the dough is ready. Carefully punch down the dough to release the trapped gases, then divide it into portions weighing approximately 80 grams each, which should yield around 12 rolls. Shape each portion into a smooth ball, then cover them with a clean towel and let them rest for 15 minutes to relax the gluten. For shaping, take one dough ball and roll it into a long teardrop form. Using a rolling pin, flatten the bottom, narrower half of the dough, gently stretching it with your hands as you work. Then, flatten the wider top half. Once you become proficient, this process is quite quick. Place one of the prepared butter chunks onto the wide end of the flattened dough. Starting from the butter, roll the dough downwards towards the narrow tip, carefully tucking and guiding the dough to ensure the butter remains snugly enclosed. Place the shaped rolls seam-side down onto a baking tray, cover them, and allow them to proof for another hour, or until they’ve doubled in size again.
Baking and Finishing Touches
Preheat your oven to a hot 450°F (230°C). Before baking, lightly spritz the surface of each roll with water and sprinkle them with salt; flaky sea salt is ideal for this. Just before they go into the oven, give each roll a generous second spritz of water, using about 20 pumps per roll. Immediately reduce the oven temperature to 400°F (200°C) and bake for 12 to 15 minutes, rotating the baking tray halfway through to ensure even browning. The rolls are ready when they achieve a beautiful golden hue; they might require the full 15 minutes. A crucial final step, often shared via video tutorials, involves basting the rolls. As soon as they emerge from the oven, brush them generously with the butter that has melted out during the baking process. This step enhances the shine and flavor, making the bread even more irresistible. While a nonstick pan is recommended for easy release, baking on a regular aluminum tray can actually result in a browner, crispier bottom. Be aware that making Shio Pan is a time-intensive process, requiring about two hours of prep before baking, not including proofing. However, the reward is a batch of warm, delicious Shio Pan with that perfect combination of soft interior, buttery core, crispy exterior, and a hint of salt, often surpassing bakery versions when enjoyed fresh.