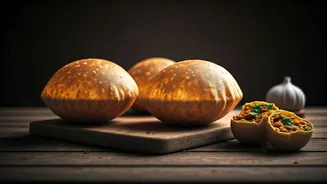


Dough Perfection Starts
Achieving soft, pliable bhaturas that hold their stuffing begins with the fundamental dough. A well-balanced mixture incorporating ingredients like yogurt,
a touch of semolina, a pinch of baking powder, and a hint of sugar contributes to both its elasticity and tenderness. When you begin kneading, opt for lukewarm water; this simple step aids in developing a smooth, flexible dough that significantly reduces the likelihood of cracks appearing when you shape or roll it. A dough that is too stiff or dry is a primary culprit for tearing, so investing time in getting this initial stage right is paramount for successful stuffed bhaturas. The right texture ensures it can encase the filling without splitting.
The Crucial Rest Period
Don't be tempted to rush the process! Allowing your prepared dough to rest is a critical step that many home cooks overlook, and it's vital for creating truly soft and fluffy bhaturas. A resting period of one to two hours gives the gluten strands within the dough the time they need to relax and develop properly. This relaxation makes the dough much more cooperative, yielding easily to shaping and rolling without resistance. Furthermore, this resting phase contributes significantly to the final texture of the fried bhatura, ensuring it becomes wonderfully light and airy. Skipping this step can lead to a denser, less pliable bread that is more prone to cracking.
Dry Filling is Key
The heart of your stuffed bhatura is its filling, and its moisture content is a critical factor in preventing the dough from breaking. For instance, if you're using a paneer-based stuffing, ensuring it is completely dry is non-negotiable. Any excess water or moisture within the filling can seep into the dough, weakening its structure and making it susceptible to tearing during the rolling process or even bursting in hot oil. Season your filling judiciously, using a balanced blend of spices to enhance flavour, but always prioritize a firm and cohesive mixture that can be easily contained within the dough without causing it to become soggy or unstable. A well-formed, dry filling is essential for integrity.
Careful Sealing and Rolling
Once your dough is prepared and your filling is ready, the next crucial steps involve sealing the stuffing and rolling the bhatura. It is imperative to meticulously seal the dough around the filling, ensuring that there are no gaps or weak points where the stuffing can escape. After sealing, employ a gentle hand when rolling. Use minimal pressure, focusing on creating an even disc. A common technique that aids in preventing tears is to keep the center of the bhatura slightly thicker than its edges. This distribution of thickness helps the dough withstand the pressure of frying and prevents the edges from splitting, ensuring the filling remains securely enclosed.
Optimal Frying Conditions
The temperature of your frying oil plays a pivotal role in how your bhaturas puff up and cook. For the best results, the oil must be adequately heated. If the oil is too cool, the bhatura dough will absorb an excessive amount of oil, resulting in a greasy, flat bread that fails to achieve that desirable puffed, airy texture. Properly heated oil allows the bhatura to puff up almost immediately upon hitting the surface. It's a delicate balance; oil that is too hot can cause the outside to brown too quickly before the inside is cooked, but being too cool is a more common pitfall that directly impacts puffiness and oil absorption.
Encouraging the Puff
Once your bhatura is submerged in the hot oil and you see it starting to puff, a little gentle intervention can make a significant difference in achieving that characteristic light and airy texture. As it fries, use a slotted spoon to carefully and gently press down on the bhatura. This slight pressure helps to encourage an even expansion, pushing the steam and air outwards and upwards, leading to a more uniform and delightful puff. This technique ensures that the entire bhatura inflates beautifully, creating the signature pillowy consistency that makes this dish so enjoyable. Patience and gentle handling are key during this final cooking stage.