


Choosing Gluten-Free Flours
The foundation of any great gluten-free roti lies in selecting the right flours. Several options work well. Rice flour, a staple, provides a neutral flavor
and good structure. Ensure it's finely ground for best results. Another excellent choice is sorghum flour (jowar), which lends a slightly sweet taste and nice texture. Buckwheat flour, despite its name, is gluten-free and offers a nutty flavor, perfect for a different twist. Tapioca flour (or cassava starch) acts as a binder, adding elasticity and helping to prevent cracking. When experimenting, try a blend of flours to achieve the desired texture and taste. Consider using a ratio like 1:1:1 of rice flour, sorghum flour, and tapioca flour as a starting point. Always start with small batches to adjust the flours and water. A mix of flours can yield the most appealing results.
Mastering the Dough
Creating the dough correctly is crucial for successful gluten-free rotis. Begin by sifting your chosen flours to remove any lumps and aerate them. Gradually add warm water to the flours, mixing gently with your hands or a spoon. The goal is a pliable, non-sticky dough. The water temperature is important; warm water (around 100-110°F or 38-43°C) helps activate the starches, creating a softer roti. Knead the dough thoroughly for about 5-7 minutes. Gluten-free doughs often require a bit more kneading than wheat-based ones. This helps develop the structure and prevents cracking. Once kneaded, cover the dough with a damp cloth and let it rest for at least 15-20 minutes. This resting period allows the flours to hydrate completely, which further improves the texture and pliability of your rotis. Avoid over-kneading the dough, as this can make it tough.
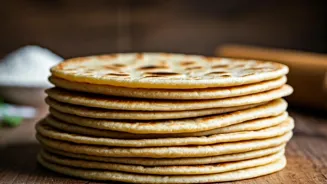
Rolling Techniques Revealed
Rolling the gluten-free rotis requires a gentle touch and patience. Start by lightly dusting your work surface with rice flour to prevent sticking. Take a small portion of dough and roll it into a smooth ball. Flatten the ball slightly and then begin to roll it out into a circle. The key is even pressure and gentle movements. Avoid pressing too hard, which can cause the roti to crack. If the roti starts to crack around the edges, gently press the edges inwards with your fingers and continue rolling. You can use a rolling pin designed specifically for this purpose. Ensure you maintain a consistent thickness throughout the roti. Aim for a thickness of about 1/8 inch (0.3 cm). Once the roti is rolled, place it on a lightly floured plate or a clean surface before cooking. Practice makes perfect, so don’t be discouraged if the first few rotis aren't perfect.
Cooking to Perfection
Cooking gluten-free rotis requires a hot griddle or tawa. Heat the tawa over medium-high heat until it is hot enough to sizzle when you flick a drop of water onto it. Gently place the rolled-out roti onto the hot tawa. Cook for about 30-60 seconds on the first side, or until small bubbles start to appear. Flip the roti and cook for another 30-60 seconds. The roti should start to puff up. If it doesn't puff, gently press down on it with a spatula. Once both sides are lightly browned and the roti has puffed up, remove it from the tawa. Immediately apply ghee or oil on both sides of the roti while it is still hot. This will enhance the flavor and keep them soft. Serve the warm rotis immediately for the best texture and flavor. Don’t overcook the rotis, as this will make them dry and tough.
Troubleshooting Common Issues
Even with careful preparation, issues might arise. If your rotis are cracking, the dough may be too dry. Add a little more water, a teaspoon at a time, and knead until smooth. If the rotis are too thick, they may be undercooked in the center; roll them thinner next time. Sticky dough can be remedied by adding a bit more of the flour mix. If the rotis are hard, they might be overcooked or the dough may not have had enough rest. Ensure your tawa is at the right temperature. Remember to gently press on the rotis to puff them up. If they are chewy, your dough might be too wet; roll them a bit thicker. Always use fresh flours, as old flours can impact the final outcome. With a little practice, and by adjusting these factors, you will be making perfect gluten-free rotis in no time.