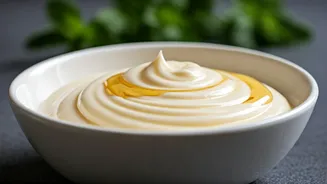


Why Make Curd?
Embracing homemade curd offers a wealth of health benefits and culinary advantages over its store-bought counterpart. Beyond the considerable cost savings,
crafting your own curd guarantees a product entirely free from artificial preservatives and additives, which can have long-term health implications. This absence of chemicals ensures a purer, more wholesome dairy product. Furthermore, incorporating homemade curd into your daily diet, especially during warmer months, provides a refreshing and cooling treat. It is packed with beneficial probiotics essential for a healthy gut, aids in digestion, and can even help manage symptoms for those with lactose intolerance. The nutritional profile is also impressive, offering a good source of vital nutrients like protein, calcium, phosphorus, and various B-vitamins, all crucial for maintaining overall bodily functions and well-being. By opting for homemade, you're making a conscious choice for a healthier lifestyle and enjoying a superior taste and texture.
Method 1: Tangy Lemon
For a delightful, slightly tangy curd with excellent consistency, the lemon juice method is a fantastic choice. This technique leverages the natural acidity of lemons to initiate the curdling process efficiently. When you introduce the juice of half a lemon to a litre of whole milk, the acid in the lemon interacts with the milk proteins, causing them to coagulate and form curds. This method is particularly effective because it provides a controlled and consistent way to kickstart fermentation. The resulting curd is thick and has a pleasant, mild tanginess that can enhance the flavor of various dishes. It’s a simple yet ingenious way to achieve that desirable texture and taste without relying on any artificial agents, making it a healthy and readily accessible option for anyone looking to make curd at home.
Method 2: Subtle Chilli
The green chilli method offers a unique approach to making curd, capitalizing on the natural presence of lactobacillus bacteria on the chilli's surface. By adding one whole green chilli, or one with its top portion removed, to a litre of whole milk, you introduce these beneficial bacteria, which are crucial for fermentation. This method results in a curd that sets well and, surprisingly, does not impart a strong chilli flavor. While the texture might be slightly thinner compared to the curd made with lemon juice, it remains a reliable and effective way to cultivate your own curd. It’s a testament to how natural elements can be harnessed for culinary purposes, providing a healthy and delicious outcome without any added fuss or complexity. This approach is ideal for those seeking a subtle yet effective natural starter.
Method 3: Classic Starter
When it comes to consistent, perfect curd, the classic method of using an existing spoonful of good-quality curd as a starter reigns supreme. This technique is widely considered the most reliable because the starter curd already contains a robust and active culture of beneficial bacteria, the very agents responsible for the fermentation process. By introducing this live culture to warm milk, you essentially provide a perfect environment for rapid and efficient curd formation. The outcome is a curd with an ideal texture and the familiar, comforting taste that many associate with homemade dairy. This method simplifies the process significantly, ensuring a high probability of success even for novice curd makers, and consistently delivers a product that is both delicious and wholesome.
Achieving Thick Curd
To ensure your homemade curd achieves that desirable thick and firm consistency, several key steps and considerations are vital. Begin by selecting whole milk, as its higher fat content contributes significantly to a richer, thicker end product. Boiling the milk and then simmering it on low heat for an extended period, ideally around 10 minutes, helps to reduce its water content, concentrating the solids and fats. This simmering is crucial for thickening. After simmering, it’s important to cool the milk to a lukewarm temperature – not too hot, as it can kill the starter culture, and not too cold, as it will slow down fermentation. A crucial step for aeration is frothing the milk, which can be done by transferring it between containers multiple times. This process introduces oxygen and contributes to a smoother texture. Finally, incorporating the curd starter culture and allowing it to set in a warm environment for 5 to 8 hours, or even overnight, depending on ambient temperature, will yield the best results.
Pro Tips for Success
Achieving perfectly set, thick curd at home involves a few expert tips and careful attention to detail. Always opt for fresh, good-quality curd as your starter culture and ensure it's brought to room temperature before mixing it into the milk; the quantity can range from one teaspoon to one tablespoon per litre. Thoroughly whisking the starter into the milk is essential to ensure uniform distribution of the active cultures. Avoid using sour curd as a starter, as this will inevitably lead to a sour final product. Remember to gently dissolve the starter culture, as vigorous stirring can sometimes disrupt the delicate bacterial balance. For those in cooler climates, extending the setting time or placing the curd in a warm environment like an oven or wrapped in warm sweaters can accelerate the process. Patience and consistent practice, perhaps setting the curd twice, will help you fine-tune the technique and consistently achieve excellent results.