


Ingredients You'll Need
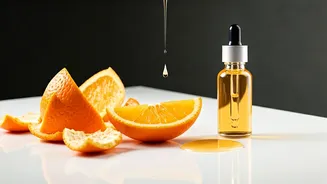
Embark on your DIY skincare journey with just a few readily available items. The star ingredient is 2-3 organic oranges; opting for organic is paramount
to avoid harmful pesticides found on conventional fruits. You'll also need 2 tablespoons of rose water, or distilled water as a substitute, to act as the liquid base for extraction. For a soothing and hydrating foundation, procure 1 tablespoon of pure aloe vera gel. To enhance moisture retention, incorporate ½ teaspoon of vegetable glycerin, a potent humectant. Finally, add the benefits of 2 Vitamin E capsules, which not only provide an antioxidant boost but also help slow down the serum's oxidation process, ensuring its longevity and efficacy.
Crafting Your Serum
Begin by meticulously preparing the orange peels. After thoroughly washing your organic oranges, carefully peel them, ensuring you remove as much of the bitter white pith as possible. Lay the peels flat on a surface and allow them to dry completely; this can be achieved by sun-drying for several days or by baking them in an oven set to its lowest temperature for an hour or two. Once dried, grind the peels into a very fine dust using a blender or grinder. Sieve the resulting powder to eliminate any coarse particles, guaranteeing a smooth texture for your serum. Next, in a small bowl, combine a tablespoon of this finely ground citrus powder with approximately two tablespoons of rose water. Cover the mixture and let it steep for 4 to 6 hours; this crucial steeping time allows the water-soluble Vitamin C to be effectively extracted from the peels. After steeping, strain the liquid through a cheesecloth or coffee filter, pressing to extract every last drop of the infused liquid, and discard the leftover pulp. In a separate container, blend this infused orange liquid with the aloe vera gel and vegetable glycerin. Pierce the Vitamin E capsules and add their oil to the mixture. Whisk all the ingredients together vigorously until the aloe vera gel is fully dissolved and the serum achieves a slightly cloudy, pleasant gel-like consistency.
Storage and Application
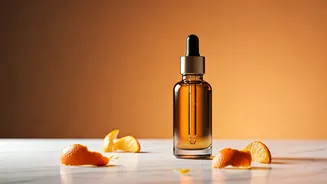
To preserve the potency of your homemade serum, transfer it into a dark glass dropper bottle, ideally amber or cobalt blue. This dark glass packaging is essential as it protects the delicate Vitamin C from light, which can quickly degrade its effectiveness. Since this serum contains no artificial preservatives, it must be stored in the refrigerator to prevent the growth of mold and bacteria. When you are ready to use the serum, start by cleansing your face thoroughly. Apply 3-4 drops of the serum, gently massaging it into your skin with upward strokes. Follow this application with your preferred moisturizer to lock in the benefits. If you choose to apply the serum in the morning, it is absolutely imperative to finish with a broad-spectrum sunscreen. Vitamin C inherently increases your skin's sensitivity to UV radiation, and unprotected exposure to the sun can rapidly neutralize the beneficial antioxidants you've just applied.
Realistic Expectations
While DIY skincare offers a rewarding and natural approach, it's vital to maintain realistic expectations regarding its efficacy and lifespan. Natural Vitamin C, particularly from sources like orange peels, is inherently unstable. If your serum begins to change color, turning a dark yellow or brown, or if it develops an unusual odor, this indicates oxidation, meaning it has lost its potency and should be discarded immediately. You will need to prepare fresh batches of the serum every 7 to 10 days to ensure you are consistently using an active product. It's also important to understand that a homemade, water-based extract, while beneficial, will not penetrate the skin barrier as deeply as professionally formulated clinical serums. The benefits are primarily at a surface level, offering beautiful brightening and hydration. Therefore, view this DIY serum as a gentle, supplementary treatment. Before applying it to your entire face, always perform a patch test on your jawline 24 hours in advance to check for any adverse reactions.