


When to Transplant
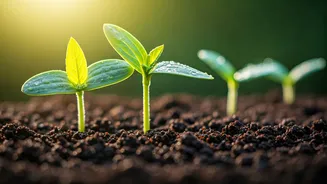
The opportune moment to transition your seedlings from indoor comfort to the outdoor world hinges on several critical factors. Primarily, ensure the threat
of frost has completely receded from your region, especially for plants sensitive to cold, often marking early spring as the ideal window. A visual cue for readiness is the presence of at least three to four true leaves, distinguishable from the initial cotyledons (seed leaves) that emerge first. Crucially, seedlings must undergo a process known as 'hardening off' before they can withstand the harsher outdoor environment. This gradual acclimatization prevents transplant shock, which can be fatal to unprepared young plants. For cool-season varieties like cabbage and broccoli, transplanting can even occur several weeks prior to the last expected frost date, as these plants thrive in cooler temperatures and are less susceptible to cold damage.
Hardening Off Essentials
Hardening off is an indispensable step that bridges the gap between a controlled indoor environment and the variable conditions outside. It's a deliberate process of gradually exposing seedlings to the elements over a week or two. Begin by placing them in a shaded, protected outdoor spot during the day, bringing them back inside at night, especially if temperatures drop below 50°F. As the days progress, incrementally increase their outdoor exposure and, importantly, their exposure to direct sunlight. By the end of this period, when nighttime temperatures consistently remain above 50°F, you can start leaving them outside overnight, though caution is advised against frost. This slow transition allows the seedlings' tissues to toughen up and their internal systems to adapt to fluctuating temperatures, humidity, and sunlight intensity, significantly reducing the risk of shock and promoting stronger growth once planted in the garden.
Transplanting Technique
With your seedlings successfully hardened off and the weather cooperating, the actual transplanting into the garden soil can commence. First, select the right location for each plant, ensuring sun-loving varieties receive ample direct sunlight and shade-tolerant ones are situated appropriately. When digging the planting hole, make it slightly wider than the seedling's root ball and ensure its depth matches the height of the pot it's currently in. To remove the seedling, gently squeeze the pot to loosen the soil, or use a thin implement like a butter knife to carefully separate the soil from the pot's inner edge. Tip the pot on its side and coax the seedling out, aiming to preserve the integrity of the root ball as much as possible. Place the seedling into the prepared hole, then backfill with a nutrient-rich mixture of compost and garden soil. Gently firm the soil around the base of the plant. Finally, water thoroughly with a watering can to help settle the soil and eliminate air pockets, and continue to keep the soil consistently moist thereafter.