


Crafting the Dough
Embark on the culinary journey of making Mathi by first preparing the foundational dough. Combine 1 cup of refined flour with 1 cup of semolina in a mixing
bowl. Introduce 1/2 teaspoon of ajwain (thymol seeds) for its distinctive aroma and 1 teaspoon of salt to enhance the flavor profile. Next, meticulously incorporate 1/4 cup of clarified butter (ghee) into the dry ingredients. Rub the ghee in with your fingertips until the mixture achieves a breadcrumb-like consistency. This crucial step ensures the desired crispness. Gradually add cold water, a little at a time, to knead a stiff dough. Once the dough comes together, cover it and let it rest in a cool place for a minimum of 15 minutes. This resting period allows the gluten to relax, making the dough easier to handle and contributing to a better texture in the final Mathi.
Shaping and Pricking
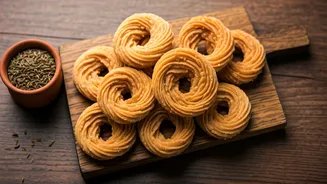
After the dough has adequately rested, it's time to shape the Mathi. Lightly flour your work surface and roll out the dough to a thickness of approximately 1/8 inch. Using a round cutter, aim for discs about 3 inches in diameter. The uniformity in size ensures even cooking. A critical step to prevent these delightful snacks from puffing up excessively during frying is to prick them thoroughly with a fork. Create a pattern of pricks all over the surface of each dough round. This allows steam to escape, resulting in the perfectly crisp and dense texture that Mathi is known for. This meticulous preparation is key to achieving the ideal bite-sized pieces ready for their transformation in hot oil.
The Frying Process
The art of frying is where Mathi truly comes alive. Begin by heating sufficient oil in a kadhai or deep frying pan over medium-high heat. To test if the oil is ready, drop a small piece of dough into it; it should rise to the surface immediately. Carefully slide as many prepared Mathi discs into the hot oil as will comfortably fit without overcrowding the pan. Allow them to cook for a moment before gently turning them over. Once turned, reduce the heat to medium. This controlled temperature is vital for ensuring the Mathi cooks through without burning. Fry them until they achieve a beautiful, light brown hue on both sides. Once perfectly golden, lift them out using a slotted spoon and place them on absorbent paper to drain excess oil, ensuring their signature crispiness is maintained.
Second Fry and Storage
To maintain optimal frying conditions and achieve consistent results, it's important to manage the oil temperature for subsequent batches. After draining the first batch of Mathi, you may need to increase the oil heat slightly before adding the next lot. This helps the new Mathi cook evenly and achieve that desirable golden-brown crispness without absorbing too much oil. Continue this process until all the prepared Mathi have been fried to perfection. Once the Mathi have cooled completely, they are ready to be stored. Transfer them into an airtight container. Properly stored Mathi can retain their delightful crispness and flavor for a considerable period, making them an excellent choice for stocking up on your favorite savory snack.