


Gather Your Ingredients
The journey to crafting a delightful Bread Halwa begins with gathering the necessary ingredients. You will need bread, ghee (clarified butter), sugar,
water, cardamom powder, and nuts for garnish. The quality of these components impacts the final flavor, so opt for fresh bread, pure ghee, and aromatic cardamom. Bread is the star, so opt for a good quality loaf; white bread is commonly used, but you can explore whole wheat for a healthier twist. The ghee provides the rich, buttery base, while sugar lends the sweetness and water assists in creating the halwa's moist texture. The cardamom infuses an exotic aroma and flavor, and the nuts provide a final textural and visual appeal. Be sure to have all items prepped to make cooking easier.
Prep the Bread
Preparing the bread is a crucial step for achieving the right consistency. Remove the crusts from the bread slices, as they can sometimes become tough. Cut the bread into small, uniform cubes. The size of the cubes affects the final texture – smaller cubes create a smoother halwa, while larger ones provide more texture. Once the bread is cubed, set it aside; it's essential that the pieces are evenly sized, so they cook uniformly, ensuring no parts remain dry while others are overcooked. Preparing the bread in advance allows you to concentrate on the following steps. This ensures that the bread is ready to quickly absorb the flavors of ghee and sugar.
Roast the Bread
This is where the magic starts! Heat ghee in a heavy-bottomed pan. Add the bread cubes and gently roast them over medium heat. Stir continuously to ensure even browning. The bread should turn golden brown and slightly crispy; this process deepens the flavor of the halwa and creates a lovely aroma. The roasting process is essential for removing excess moisture from the bread, resulting in a less mushy final product. Be patient during this step; it takes time to get the bread to the right color. Keep the flame at medium to prevent the bread from burning, which could affect the taste. Once the bread is perfectly toasted, remove it from the pan and set it aside.
Prepare Sugar Syrup
Next, prepare the sugar syrup. In the same pan (or a clean one), combine sugar and water. Bring the mixture to a boil, stirring until the sugar dissolves completely. After it starts boiling, reduce the heat and simmer the syrup for a few minutes. You don’t need to cook it to a specific consistency, as the bread will absorb the syrup. The syrup’s purpose is to provide the sweetness and liquid necessary for softening the bread. During this phase, you can also add cardamom powder for flavor. Stir the syrup continuously to prevent the sugar from crystallizing. The syrup’s quality is just as important as the bread, so using fresh ingredients and maintaining the right heat is crucial for the flavor.
Combine & Cook
Gently add the roasted bread to the sugar syrup, stirring continuously. This stage is critical; the bread will absorb the syrup, transforming into a soft and luscious consistency. Keep stirring to prevent the halwa from sticking to the bottom of the pan. Cook the mixture on low to medium heat, continuing to stir. This cooking process requires patience, allowing the syrup to be fully absorbed. As the halwa cooks, it will thicken. Continue to stir, preventing sticking and scorching. This step needs close attention; the halwa's texture depends on the perfect balance of heat and stirring.
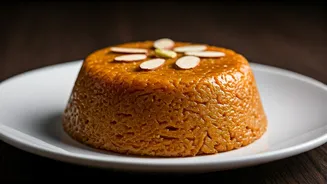
Garnish & Serve
Once the halwa has thickened and the syrup has been fully absorbed, it's time to garnish and serve. The halwa will leave the sides of the pan when done. Garnish with chopped nuts like almonds, cashews, or pistachios for added texture and visual appeal. Nuts not only improve the appearance but also add a delightful crunch. For an enhanced flavor, consider toasting the nuts before garnishing. The Bread Halwa is ready to be served hot or warm. Enjoy it as a dessert or a special treat. Serving warm enhances the flavors and provides a comforting experience. Bread Halwa is best enjoyed immediately after it's prepared, but it can be stored. This step adds the perfect final touch.