


Prepare the Ingredients
The journey to making amazing Til Chikki begins with gathering the right components. You'll need 1 cup of white sesame seeds, ¾ cup of grated and crushed
jaggery, 1 tablespoon of ghee, ½ tablespoon of cardamom powder, and 1 teaspoon of roasted peanuts. Ensure all the ingredients are measured and ready before you start cooking. This preparation stage is crucial for a smooth and efficient cooking process, ensuring the final product is a perfect balance of flavors and textures.
Roast the Seeds
Take a pan and place it over low heat. Add the sesame seeds and dry roast them. Keep a close watch on the seeds as they gently puff up and release a nutty aroma. This roasting process is essential for enhancing the flavor and crunch of the sesame seeds. Be careful not to burn the seeds; a light golden color indicates they're perfectly roasted. This step sets the stage for the rest of the recipe, giving the chikki its signature taste.
Melt the Jaggery
In a separate pan, add ghee and melt it over low flame. Incorporate the grated and crushed jaggery. The key is to melt the jaggery slowly, ensuring it turns into a smooth, glossy, and bubbly consistency. Stir continuously to prevent burning. This process is crucial, as the consistency of the jaggery determines the texture of the chikki. It should be viscous enough to coat the seeds and nuts evenly, leading to a perfectly crisp result.
Add the Goodness
Once the jaggery has melted, quickly add the roasted sesame seeds and peanuts to the pan. Mix them swiftly. The speed is of the essence here; every seed and nut must be evenly coated before the mixture cools and hardens. Next, sprinkle the cardamom powder, mixing it in quickly to make sure that its lovely aroma spreads out evenly without allowing the jaggery to cool or harden prematurely. This ensures a balanced flavor profile.
Shape and Set
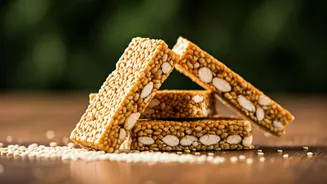
Transfer the mixture to a surface pre-greased with ghee. Use a rolling pin, also greased, to flatten it, achieving a thin, even layer. This thinness is important for that delightful crunch. The rolling must be done while the mixture is still hot, so that it can be easily shaped. The aim is to create a thin layer that will result in a crispier final product. Then, cut the sheet into square or desired shapes while it's still warm but firm.
Cool and Enjoy
Allow the chikki to cool completely. This cooling process is crucial for the chikki to set and become firm. Once cooled, break the chikki into crisp pieces. This should be done carefully to prevent crumbling. Store the Til Chikki in an airtight container to maintain its crispness and enjoy it whenever you crave a sweet treat. These homemade goodies will last you longer, and maintain their deliciousness.