
Prepare the Seeds
The journey to creating the perfect Til Chikki begins with preparing the sesame seeds. Take a pan and place it over low heat. It’s important to dry roast
the sesame seeds on this gentle heat setting. The goal is to allow them to puff up ever so slightly, and in the process, release their naturally nutty aroma. Keep an eye on the seeds to prevent burning; this will compromise the final taste. The gentle heat helps in achieving the desired texture, making them delightfully crisp in the final product. Roasting sesame seeds is a simple process, but crucial for enhancing the flavor and the final sensory experience of the chikki.
Melt the Jaggery
Next, the jaggery must be prepared to create the base for the chikki. In a pan, add ghee and let it heat. Then, introduce the grated and crushed jaggery. The key is to melt the jaggery on a low flame. As it melts, the jaggery will start to become glossy, and bubbles will begin to form on the surface, indicating it's nearly ready. This low-and-slow approach prevents burning, which can drastically alter the final taste. The goal is a smooth, molten consistency, ready to bind the sesame seeds together and give the chikki its characteristic sweet flavor.
Combine and Mix
Now, the flavorful core of the chikki is coming together. The next step is to introduce the sesame seeds and peanuts to the molten jaggery. Mix everything together briskly. It's necessary to ensure that every sesame seed and peanut is coated with the jaggery before the mixture hardens. A thorough mixing ensures the flavors are well distributed throughout the chikki. Immediately add the cardamom powder and mix it in. Ensure the aroma spreads uniformly, but work quickly before the jaggery cools down and hardens. Speed is of the essence here.
Roll It Thin
Once the mixture is ready, it is time to transfer it to a greased surface. Place the parchment paper on top, and use a rolling pin to roll it thin while the mixture is still hot. This critical step determines the overall texture and crispness of the chikki. The thinner the chikki, the crunchier it will be, making it an appealing treat. The use of parchment paper is crucial in this step. This technique ensures that the chikki maintains its smooth and uniform texture, thus resulting in that enjoyable crispy bite.
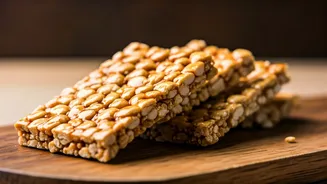
Cut and Cool
After rolling the mixture, it's time to give the chikki its final shape. Once you have a uniformly thin layer, cut the mixture into your desired shapes, usually squares. It is important to do this while the mixture is still malleable but not too hot. If you wait until it hardens, you may end up with uneven or broken pieces. Once cut, let the chikki cool completely. This cooling period is crucial for setting the chikki and allowing it to achieve its firm, crisp texture. Patience here leads to the perfect end result.
Final Touches
After the chikki has completely cooled and set, it's time to break it into individual, crisp pieces. Once set, use your hands or a knife to break the thin sheets of chikki into manageable pieces. The goal is to obtain crisp pieces that are ready to be savored. It’s also crucial to store the finished Til Chikki in an airtight box, which will help to preserve its delightful crunchiness and prevent it from absorbing any moisture. Properly storing the chikki maintains its texture and freshness, allowing you to enjoy this treat for longer.