


Trap Construction Essentials
Creating your own defense against yellow jackets is surprisingly straightforward and requires minimal supplies readily available at home. You'll need a standard
2-liter plastic beverage bottle, which will form the main structure of your trap. Essential tools include scissors or a utility knife for precise cutting. For the attractant, gather a cup of water, a teaspoon of liquid dish soap, and a quarter cup of either apple cider vinegar or a sweet fruit juice. To assemble the components, you'll also need a paper hole punch and a few twist ties for securing the parts. If you plan to hang your trap, have some thin cord or wire on hand. The process begins by carefully detaching the top section of the 2-liter bottle, just before its tapering shoulder. This creates two main pieces: a base and a funnel-like top. This simple preparation is the first step in building a barrier against unwelcome guests during warmer months.
Bait Solution Secrets
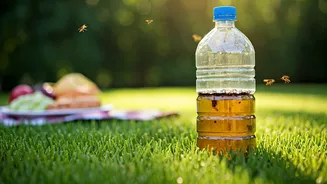
The effectiveness of your yellow jacket trap hinges significantly on the bait solution you prepare. Begin by pouring one cup of water into the base of the prepared 2-liter bottle. Next, add a teaspoon of liquid dish soap to this water. The crucial ingredient for attraction is a quarter cup of either apple cider vinegar or a sugary fruit juice. The inherent sweetness in these liquids acts as a powerful lure, drawing the yellow jackets in. The addition of dish soap is not merely for scent; it dramatically reduces the surface tension of the water. This means that when a yellow jacket lands on the surface, it will quickly become submerged and drown, rather than being able to escape. This dual-action bait is key to a successful trap, making it an indispensable part of your pest control strategy.
Assembly and Placement
Once your bait solution is mixed, it's time to assemble the trap. Carefully invert the top, funnel-shaped section of the plastic bottle and insert its neck into the base. This inverted funnel design is critical, as it allows yellow jackets to enter easily but makes it extremely difficult for them to find their way out. To secure this funnel piece firmly in place, use a paper hole punch to create two or three evenly spaced holes along the top rim of the base section. Then, thread twist ties through these holes and around the funnel's edge to hold it snugly. If you intend to hang the trap, make additional holes near the top edge and thread a sturdy cord or wire through them to fashion a hanger. For optimal results, place or hang your trap at least 20 feet away from areas where people congregate, such as porches, picnic tables, or playgrounds. It should also be suspended at least 4 feet above the ground. Consider the sun and shade exposure, as yellow jackets are drawn to warm temperatures, typically around 85°F, so strategic placement can enhance its effectiveness.
Maintenance and Enhancement
To ensure your yellow jacket trap remains an effective deterrent, regular maintenance is essential. The trap can become saturated with deceased yellow jackets quite rapidly, especially during peak season. If the trap fills up, it can paradoxically allow new yellow jackets to escape the water rather than drown. It is vital to empty the trap frequently. The best time to do this is at night, when the wasps are least active. After discarding the dead insects, rinse the trap if necessary, and refill it with a fresh batch of the bait solution before rehanging or repositioning it. To further boost the trap's allure, you can experiment with adding a small amount of jelly or syrup around the opening of the funnel. This extra sweet scent can act as an additional, irresistible draw for curious yellow jackets, drawing them directly into the trap.