






Why Start With Wall Push-ups?
The wall push-up is a foundational bodyweight exercise ideal for beginners or those seeking a joint-friendly workout. By using a wall, you reduce the amount of body weight you have to lift, putting less stress on your wrists and shoulders compared to a traditional
floor push-up. This makes it an excellent way to safely build strength in your chest, shoulders, and arms. The movement pattern is also functional, mimicking everyday actions like pushing open a heavy door or getting up from a chair. It allows you to focus on mastering the correct form—keeping your body aligned and engaging the right muscles—before progressing to more challenging variations.
Mastering the Correct Form
Proper technique is crucial for getting the most out of the exercise and preventing injury. Follow these steps for a perfect wall push-up: 1. Stand facing a sturdy wall, about an arm's length away. 2. Place your palms flat against the wall at about chest or shoulder height, slightly wider than your shoulders. 3. Step your feet back so your body forms a straight line from your head to your heels. Engage your core and glutes to prevent your lower back from sagging. 4. Inhale as you slowly bend your elbows, lowering your chest toward the wall. Aim for a 45-degree angle with your elbows, not flared out to the sides. 5. Pause for a moment when your head or chest is close to the wall. 6. Exhale and push back forcefully to the starting position, keeping your body in a straight line throughout the movement.
Muscles Worked in a Wall Push-Up
While it may seem simple, the wall push-up is a compound exercise that engages multiple muscle groups. The primary movers are the chest muscles (pectorals), the front of your shoulders (anterior deltoids), and the back of your arms (triceps). However, to maintain a stable plank position against the wall, you also recruit several stabilizing muscles. These include your core (rectus abdominis and obliques), your back muscles, and even your glutes and calves, making it a surprisingly effective full-body movement.
Common Mistakes to Avoid
To ensure your workout is both safe and effective, watch out for these common errors: - Flaring your elbows: Letting your elbows stick straight out to the sides can strain your shoulder joints. Keep them tucked at roughly a 45-degree angle. - Sagging hips: Failing to engage your core can cause your lower back to arch and your hips to dip toward the wall. Maintain a rigid plank from head to heels. - Leading with your head: Your chest should lead the movement, not your chin. Keep your neck in a neutral position, aligned with your spine. - Incomplete range of motion: To get the full benefit, lower yourself until your chest or nose is close to the wall before pushing back. Short, jerky movements are less effective.
Progressing Your Workout
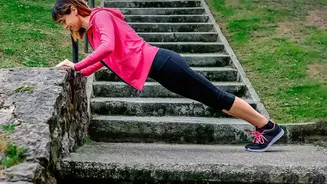
Once you can comfortably perform several sets of 10-15 wall push-ups with perfect form, it’s time to increase the challenge. The simplest way to progress is to step your feet further back from the wall. This increases the incline and forces your muscles to work harder against gravity. When that becomes easy, you can move to a lower surface, such as a kitchen countertop or a sturdy bench. This is known as an incline push-up and is the perfect bridge to performing push-ups on your knees and, eventually, a full push-up on the floor. For an added challenge, you can also try single-arm wall push-ups or slowing down the tempo of each repetition.