




Why Homemade Is Worth It
There's a universe of difference between the tubs you buy at the store and a fresh batch of hummus made in your own kitchen. The primary distinction is flavor. When you make it yourself, you control the quality and quantity of each ingredient, from the freshness
of the lemon juice to the pungency of the garlic. Store-bought versions often rely on preservatives and may use lemon juice from concentrate, leading to a duller, more generic taste. Texture is another major victory for homemade hummus. With a few simple techniques, you can achieve a luxuriously smooth, almost fluffy consistency that mass-produced hummus simply can't replicate. It's lighter, creamier, and free from the slightly gritty mouthfeel that can plague commercial options. Plus, you can serve it warm, a true delicacy that transforms the dip into a comforting and deeply satisfying experience.
Gathering Your Core Ingredients
A truly great hummus relies on just a handful of quality components. For the best results, use the freshest ingredients possible. Chickpeas (Garbanzo Beans): This is your base. While you can achieve fantastic results with canned chickpeas, cooking your own from dried will give you a slight edge in flavor and a softer texture. If using canned, look for a reputable brand and give them a good rinse. Tahini: This sesame seed paste is non-negotiable for authentic hummus. It provides the characteristic nutty depth and creamy richness. Quality can vary wildly between brands, so look for a well-stirred, smooth, and pourable tahini. Fresh Lemon Juice: This is where the 'zesty' magic happens. Always use juice from freshly squeezed lemons; the bottled variety simply doesn't compare and can impart a metallic taste. Fresh Garlic: A clove or two of fresh garlic adds a necessary punch. For a more mellow flavor, you can try roasting the garlic first. Olive Oil: A good quality extra-virgin olive oil contributes to the final texture and flavor. It’s used both in the hummus and for drizzling on top before serving. A fruity, lighter oil is often preferred.
Recipe: The Ultimate Lemon Garlic Hummus
This recipe focuses on technique as much as ingredients to deliver that sought-after creamy texture. Ingredients: - 1 can (15-ounce) chickpeas, drained and rinsed - 1/2 cup high-quality tahini - 1/4 cup fresh lemon juice (from about 1-2 lemons) - 1 to 2 medium cloves of garlic, peeled - 1/2 teaspoon ground cumin - 1/2 teaspoon salt (adjust to taste) - 2 to 4 tablespoons of ice-cold water - Extra-virgin olive oil, for serving - Paprika or sumac, for garnish Method: 1. Prepare the base: Add the tahini and fresh lemon juice to a food processor. Blend for about one minute until the mixture is thick and creamy. This step is crucial; it whips the tahini, which helps in achieving a smoother final product. 2. Add Aromatics: Add the peeled garlic cloves, cumin, and salt. Blend for another 30 seconds until everything is well combined and the garlic is minced. 3. Add the Chickpeas: Add the drained and rinsed chickpeas to the food processor and blend continuously for 2-3 minutes. Scrape down the sides of the bowl as needed to ensure everything is incorporated. 4. Achieve Creaminess: While the processor is running, slowly drizzle in 2 tablespoons of ice-cold water. The cold water reacts with the tahini to create an even lighter, fluffier texture. Continue blending for another 1-2 minutes until you have a supremely smooth puree. If the hummus is thicker than you'd like, add more ice water, one tablespoon at a time, until you reach your desired consistency. 5. Taste and Adjust: Taste the hummus and adjust the seasoning. You may want more salt, another squeeze of lemon, or an extra pinch of cumin.
Tips for Unbeatable Texture
For those truly dedicated to the craft of hummus, a few extra steps can elevate your dip from great to sublime. The number one trick for the creamiest possible hummus is to remove the skins from the chickpeas. This can be tedious, but there’s a shortcut: after draining the canned chickpeas, place them in a pot with 1/2 teaspoon of baking soda and cover with water. Bring to a simmer for about 5-6 minutes. The skins will begin to float to the top, making them easy to skim off. Rinse the chickpeas well before using. Another pro-tip involves the temperature of your ingredients. Some experts suggest using chilled chickpeas and even chilled water from cooking the beans (aquafaba) to help create a more stable emulsion and thicker result. Finally, don’t underestimate the power of blending. A high-powered food processor or blender makes a significant difference. Let it run for longer than you might think necessary—a full 5-8 minutes of blending is not uncommon for achieving a perfectly silky texture.
How to Serve and Store
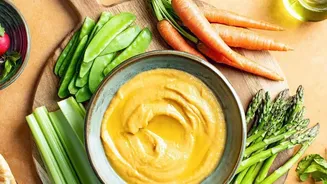
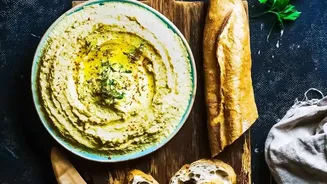
The classic way to serve hummus is in a shallow bowl, using the back of a spoon to create an elegant swirl. Drizzle generously with high-quality extra-virgin olive oil and garnish with a sprinkle of paprika, sumac, or za'atar. But don't stop there. Warm pita bread is a classic pairing, but crunchy vegetables like carrot sticks, cucumber slices, bell pepper strips, and snap peas are also fantastic dippers. For a more substantial meal, use your homemade hummus as a platter centerpiece, surrounded by grilled chicken, falafel, and fresh veggies. It also makes a delicious and healthy spread for sandwiches and wraps, replacing mayonnaise or other condiments. Store any leftover hummus in an airtight container in the refrigerator for up to five days. A thin layer of olive oil on top can help preserve its freshness.