





Why a Centred Wick Is Non-Negotiable
Before diving into the 'how', it's important to understand the 'why'. A wick that is not properly centered can cause a host of problems that go beyond simple aesthetics. The most significant issue is safety. When a flame burns too close to the side of a glass
container, it creates intense, localized heat. This thermal stress can cause the glass to crack or even shatter. An off-center wick also leads to an uneven burn, a frustrating issue known as 'tunnelling'. Tunnelling occurs when the flame only melts the wax in the center, leaving a ring of hard, unused wax around the edges. This wastes wax, shortens the life of your candle, and can diminish the scent throw, as a full melt pool is needed to properly release the fragrance oils. Finally, a flame that’s too close to the glass will produce unsightly black soot on one side.
Start with a Strong Foundation
Achieving a perfectly centered wick begins before you even melt your wax. The first step is to securely fasten the metal tab at the base of your wick to the exact center of your container. Most candle makers use a wick sticker or a dab of hot glue for this. To find the center, you can eyeball it in a clear container or use a ruler for opaque ones. Securing the wick at the bottom prevents it from floating or drifting when you pour the hot wax. Even if it looks straight initially, the force of the pouring wax and the changes during cooling can cause it to shift, which is why the next step is so critical.
The Challenge of Cooling Wax
As wax cools and solidifies, it shrinks. This process can pull and tug on the wick, causing it to lean or curve even if it was perfectly straight when you poured. This is the moment where many beginner candle makers find their projects go awry. The key is to keep the top of the wick taut and perfectly centered while the entire candle hardens. This requires a tool to hold it in place. Luckily, you don't need expensive equipment; several effective methods use common household items.
Method 1: The Clothespin Trick
One of the most popular and accessible DIY methods involves a simple clothespin. After pouring your wax, gently pull the wick taut and clip it into the clothespin's jaws. You can then rest the clothespin across the rim of your candle jar. The clothespin will hold the wick upright and in the center while the wax cools around it. This method is excellent for single-wick candles and requires no special purchases. For it to work effectively, ensure the clothespin rests flat and stable across the jar opening.
Method 2: The Skewer or Pencil System
Similar to the clothespin trick, you can use a pair of chopsticks, pencils, or skewers to create a stable holder. Place the two items parallel across the top of your jar, and trap the wick between them. You can secure the sticks together with rubber bands or tape to ensure they maintain a firm grip on the wick. Some crafters simply wrap the excess wick around a single pencil and lay it across the jar, letting the tension keep it straight. This is another highly effective, low-cost solution for keeping your wick perfectly aligned.
Method 3: Investing in a Wick Bar
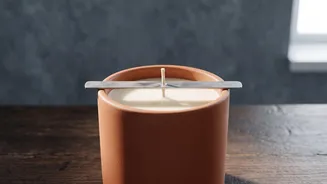
If you plan on making candles regularly, a dedicated wick centering tool, often called a wick bar, can be a worthwhile investment. These are typically small metal or wooden bars with a notch or hole in the center designed to hold the wick. They rest securely on the jar's rim and provide a consistent, perfect center every time, which is especially helpful when making multiple candles at once. There are even advanced centering tools designed for specific jar sizes or for multi-wick candles, offering precision for more ambitious projects.