



The Effortless Power of Softness
There's a reason why the low bun with loose tendrils has become a red-carpet and everyday staple, seen on everyone from Meghan Markle to Jennifer Lopez. This simple addition instantly relaxes a formal updo, turning it from severe to sophisticatedly soft.
It catches the light, adds movement, and draws attention to your facial features in a flattering way. The beauty of this style lies in its versatility; it’s polished enough for a wedding or formal event, yet casual enough for the office or a weekend brunch. It’s the ultimate “I woke up like this” but-make-it-fashion hairstyle.
Finding the Right Frame for Your Face
While this style is universally flattering, you can tailor it to your specific face shape for maximum impact. For round faces, longer strands that start below the chin help create an elongating effect. If you have a square or angular jawline, soft, wispy layers and waves will soften your features beautifully. Heart-shaped faces can use chin-length pieces to create balance, drawing attention away from a wider forehead. And for those with oval faces, almost any style of face-framing works, so feel free to experiment with length and texture.
Step 1: Prep for Perfect Texture
The foundation of a great bun, especially a soft one, is the right hair texture. This style often works best on second-day hair, which has more natural grip. If you’re starting with clean hair, create some texture with a dry shampoo or a texturizing spray. This will prevent the bun from looking too slick and help your pins stay in place. Brush your hair to remove any tangles, gathering it smoothly at the nape of your neck. For an extra sleek base before you create the bun, you can run a flat iron through your hair. If your hair is prone to frizz, a smoothing serum can also be your best friend here.
Step 2: Create the Low Bun
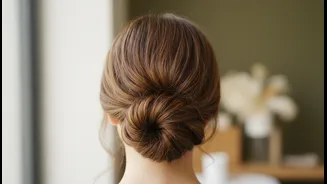
Gather your hair into a low ponytail at the nape of your neck. Before securing it, decide which strands you'll leave out to frame your face. A good rule of thumb is to pull out a small section from each temple, roughly a centimetre or two wide. Now, secure the ponytail with a hair tie. To create the bun, you have a few options. You can twist the ponytail, wrap it around its base, and secure with bobby pins. Alternatively, for a fuller look, you can split the ponytail in two, tie it in a simple knot, and then pin the ends. Don't worry about making it perfect; a little messiness adds to the charm.
Step 3: Style the Face-Framing Strands
This is where the magic happens. How you style these loose pieces determines the final mood of your look. For a soft, romantic feel, use a curling wand to create a gentle wave in each strand, curling away from your face. For a more modern, '90s-inspired vibe as seen on Kendall Jenner, you can leave them straight and piecey. If you have natural curls, let them do their thing! You can define them with a bit of cream if needed. The key is to make them look intentional but effortless. A light misting of hairspray will give them hold without making them stiff.
Making It Last: Pro Tips
Once your bun and strands are perfectly styled, a few finishing touches will ensure it lasts. A light-hold, luminous hairspray will keep everything in place without a crunchy, stiff feeling. To add a touch of volume at the crown, gently pinch and pull at the hair on top of your head before you finalize the style. If you have shorter layers that tend to pop out, a few well-placed bobby pins that match your hair color can discreetly secure them. For an extra touch of glamour for a special occasion, consider adding a decorative accessory like a pin or a velvet bow.