





Why Bees Need A Safe Sip
Like all living things, bees need water to survive. But it's not just for drinking. Honey bees collect water and bring it back to the hive for several crucial reasons. They use it to help regulate the colony's temperature through evaporative cooling,
much like a natural air conditioner. Water is also used to dilute crystallised honey to make it edible and to mix with pollen to create a nutritious food for their larvae. The problem is, bees aren't swimmers. They breathe through small holes in their bodies called spiracles, and if these get submerged, the bee can drown very quickly. A decorative bowl with deep water and slippery sides offers no safe way for a bee to drink, turning a potential oasis into a fatal trap.
Your Simple Bee-Friendly Toolkit
The good news is that creating a safe water source for bees is incredibly simple and requires items you likely already have at home. You don’t need anything fancy or expensive. Here’s a basic list of what you’ll need to assemble a 'bee bath'. A shallow container: A terracotta plant saucer, an old pie dish, or a shallow bowl will work perfectly. The key is that it shouldn't be more than a few inches deep. Landing materials: This is the most important part. Gather a collection of small rocks, pebbles, glass marbles, or even twigs and wine corks. These items break the water's surface and give bees a place to land safely. Clean water: Just plain, clean water is all that’s needed. There's no need to add sugar, honey, or anything else, as this can be harmful and attract unwanted pests.
A Step-by-Step Guide to Your Bee Bath
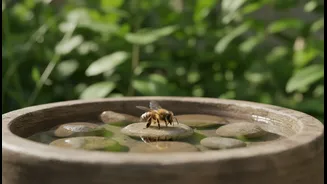
Ready to build? It takes less than five minutes to create a haven for thirsty pollinators. 1. Choose and clean your dish. Pick your shallow container and give it a good wash with soap and water to remove any residue, then rinse it thoroughly. 2. Arrange your landing spots. Fill the bottom of the dish with your collection of pebbles, marbles, or rocks. The goal is to create many small islands and shallow edges for the bees to stand on. You can get creative here, using colourful marbles or smooth river stones to make it an attractive feature in your garden. 3. Add the water. Slowly pour clean water into the dish. Fill it just enough so that the tops of your stones and pebbles are still dry and exposed. This ensures the bees have plenty of secure, dry footing while they drink. 4. Find the perfect spot. Place your new bee bath in your garden, on your balcony, or near flowering plants where pollinators are likely to visit. Putting it in a somewhat shady spot can help keep the water from evaporating too quickly on hot days.
Keeping Your Water Station Safe and Clean
A little bit of maintenance ensures your bee bath remains a healthy and helpful resource. The main concern with any standing water is the potential for mosquitoes to breed. To prevent this, you should empty, scrub, and refill the container with fresh water every two to three days. This simple act disrupts the mosquito life cycle, which takes longer than that to complete. During hot spells, you may need to top up the water daily as it evaporates. Consistency is key; once bees find a reliable water source, they will continue to return. Some beekeepers even note that bees seem to prefer slightly 'dirty' water, which may contain more minerals, so don't worry if a little algae appears before your next cleaning.